# Introduction
SurgeGrowth is one stop solution for your entire monetisation stack.
Say goodbye to juggling multiple stores - effortlessly manage your subscription and in-app purchase catalogs across the App Store, Play Store, and others. Leverage workflow automation to streamline bulk price adjustments, maintain localize pricing, and much more.
Check out our [Quickstart guide](/price-localisation/quickstart-guide) to quickly get started. It takes no more than 15 minutes to setup everything up! *No engineering help required.*
# Quickstart guide
We’re excited to have you on board with SurgeGrowth! Localized pricing is what the world deserves, and every app developer should embrace it. Big tech companies are already leading the way—now it’s your turn to join them. Get started in just 15 minutes with 3 simple steps! *No engineering help required.*
## Step 1: Configuring Payment Processors (5 mins)
The first step, after sign up, is to connect your platforms(App Store and Play Store). This allows us to import your existing product SKUs and enables seamless catalog management, including creating new SKUs, updating prices, and setting up offers.
*Please ensure you have admin access to both your Play Store and App Store accounts before proceeding with the steps below.*
### **1.a - Apple App Store configuration**
In SurgeGrowth Dashboard, go to [*Payment Processors*](https://beta.surgegrowth.io/dashboard/payment-processor) *tab* and select App Store. Fill in the required fields following the instructions below.
To locate the App Bundle ID and App ID, log in to [App Store Connect ](https://appstoreconnect.apple.com/)and navigate to **Apps**. Select the desired app, then open the **App Information** tab. The Bundle ID and App ID will be listed in the **General Information** section.
The next step is to generate the In-App Purchase API keys, along with the Key ID and Issuer ID. Follow [these steps](/miscellaneous/app-store-in-app-purchase-api-key) to complete the process.
After entering all the required information, click **Save Changes** to establish the connection with the App Store.
### **1.b - Google Play Store configuration**
In SurgeGrowth Dashboard, go to [*Payment Processors*](https://beta.surgegrowth.io/dashboard/payment-processor) *tab* and select Google Play. Fill in the required fields following the instructions below.
To find Package Name, open the [Google Play Developer Console](https://play.google.com/console/u/0/developers) and select the app whose ID you need. The ID is specified next to the app's name and logo.
\
The next step is to generate the service account key file. Follow [these steps](/miscellaneous/google-play-store-credentials) to complete the process.
After entering all the required information, click **Save Changes** to establish the connection with the Google Play.
## Step 2: Import existing products (5 mins)
You can easily import your existing product SKUs from Google Play and the App Store. The process differs for in-app purchases and subscription products.
### 2.a - In-app purchase (Consumable and Non-consumable)
Watch [steps to import IAP products in bulk](/video-demos/5-bulk-import-existing-iap-products) or follow the steps given below:
1. Navigate to the **Bulk Changes** tab.
2. Click the **plus sign** and select **Import Product**.
3. **Upload the CSV file** containing the mapping between the product name, App Store Product ID, and Play Store Product ID.
4. Review the uploaded CSV file and correct any errors if found.
5. Click **Import** to initiate the import process.
### 2.b - Subscription products
*Coming soon*
## Step 3: Set localized pricing for imported products (5 minutes)
SurgeGrowth makes it super easy to update product prices in bulk.
Follow these steps to update product prices in bulk (or watch this [explainer video](/video-demos/4-bulk-update-prices-for-multiple-products-both-iap-and-subscriptions)):
1. Go to the [**Bulk Changes**](https://beta.surgegrowth.io/dashboard/bulk) tab.
2. Click the **plus sign** and select **Change Prices**.
3. Now, select all the imported products.
4. Update the base price for the selected products, or skip this step if not needed.
5. In the next step, select the [pricing index](/pricing-index/what-is-a-pricing-index) you want to map these products to. Based on the selected index, regional prices will be updated on Google Play and the App Store.
6. Select **Change Now** to update the prices of all products, then click **Confirm**.
The update process will begin, and within a short time, regional prices will be updated on Google Play and the App Store.
#### That's it. This completes your first time set up.
# What is a pricing index?
The Pricing Index is a system that adjusts localized prices across countries based on purchasing power, using USD as the standard. It assigns a price multiplier to each country to reflect local economic conditions. For instance:
* If India’s Pricing Index is **0.5**, an item priced at **$10** in the U.S. would cost **$5** in India. After converting to the local currency, this would amount to approximately **INR 425** (assuming an exchange rate of $1 = INR 85).
* Similarly, if a country’s Pricing Index is **1.2**, the same item would cost **$12** in that country.
This approach ensures pricing is equitable and aligned with the local buying power, making it especially useful for global digital products, apps, and services. This approach of adjusting pricing based on each country's economic level can potentially lead to up to a **30% increase in revenue**.
The most widely used pricing index is **Purchasing Power Parity (PPP)**. To explore the various indexes we support, visit the [**Pricing Index**](https://beta.surgegrowth.io/dashboard/pricing-index) tab.
# Supported pricing indexes
1. **Purchasing Power Parity (PPP):** A global pricing model that compares the cost of a standard basket of goods across countries to account for differences in purchasing power, ensuring price fairness based on local economic conditions. Check [this](https://www.investopedia.com/updates/purchasing-power-parity-ppp/) out for more details.
2. **Netflix Price Index:** A country-specific pricing metric that compares Netflix subscription costs worldwide, highlighting affordability relative to each country's average income and local pricing strategies. Read [this](https://www.visualcapitalist.com/cp/mapped-how-much-netflix-costs-in-every-country/) for more.
3. **Spotify Pricing Index:** A comparative index that evaluates Spotify subscription costs across regions, adjusting for local currencies and purchasing power to reflect affordability for users in different markets. Check [this](https://mts.io/projects/spotify-pricing/) out for more details.
4. **Big Mac Index:** A lighthearted economic indicator that uses the cost of a McDonald's Big Mac burger across countries to measure currency valuation and purchasing power differences globally.
If you would like additional pricing indexes to be available, please reach out via email at .
Also, you can [create your own pricing index](/pricing-index/create-your-own-pricing-index) as well, if you want to edit price multiples for a few specific set of countries.
# Create your own pricing index
If a default pricing index doesn’t fit your needs, you can create a custom one. For example, the **Netflix Price Index** sets India’s multiple at **0.39X** (e.g., $10 in the U.S. = $3.90 in India). If you want to adjust it to **0.5X** while keeping other values unchanged, copy the index and modify India’s value to suit your requirements.
#### Following are the steps to create your own pricing index([Video demo)](/video-demos/3-create-custom-price-indexes):
1. Go to the **Pricing Index** tab.
2. Click on the **plus sign** to create a custom pricing index.
3. Select the base index and give a name to your new pricing index. Then click **Next**.
4. A custom pricing index will be created in **DRAFT** mode, allowing you to edit price ratios for countries as needed.
5. Once the updates are complete, save and publish the index to switch it to **PUBLISH** mode.
The custom index is now available for use when setting up product prices.
# Refresh price index
To account for currency fluctuations, SurgeGrowth enables you to recalculate regional prices based for selected index, ensuring they stay updated with the latest exchange rates at regular intervals (e.g., every 7 days, 30 days, 90 days, etc.).
To set up a price index refresh, follow these steps( or check out [demo video](/video-demos/6-update-price-index-to-regularly-update-currency-exchange-rate)):
1. Go to the **Scheduled Changes** tab.
2. Click the **plus (+)** icon and select **Refresh Price Index**.
3. Choose the index you want to refresh.
4. Select the refresh frequency (e.g., every 7 days, 30 days, or 90 days).
5. Pick a start date and click **Confirm** to set up the recurring schedule.
# Import existing products (IAP)
Watch [steps to import IAP products in bulk](/video-demos/5-bulk-import-existing-iap-products) or follow the steps given below:
1. Navigate to the **Bulk Changes** tab.
2. Click the **plus sign** and select **Import Product**.
3. **Upload the CSV file** containing the mapping between the product name, App Store Product ID, and Play Store Product ID.
4. Review the uploaded CSV file and correct any errors if found.
5. Click **Import** to initiate the import process.
# Set parity pricing for imported products
Follow these steps to update product prices in bulk (or watch this [explainer video](/video-demos/4-bulk-update-prices-for-multiple-products-both-iap-and-subscriptions)):
1. Go to the [**Bulk Changes**](https://beta.surgegrowth.io/dashboard/bulk) tab.
2. Click the **plus sign** and select **Change Prices**.
3. Now, select all the imported products.
4. Update the base price for the selected products, or skip this step if not needed.
5. In the next step, select the [pricing index](/pricing-index/what-is-a-pricing-index) you want to map these products to. Based on the selected index, regional prices will be updated on Google Play and the App Store.
6. Select **Change Now** to update the prices of all products, then click **Confirm**.
The update process will begin, and within a short time, regional prices will be updated on Google Play and the App Store.
#### That's it. This completes your first time set up.
# Create new product
Watch steps to [create new IAP product](/video-demos/1-create-new-product-with-global-prices-across-platforms) or follow the steps given below:
1. Navigate to the [**Consumable**](https://beta.surgegrowth.io/dashboard/consumable) or [**Non-Consumable** ](https://beta.surgegrowth.io/dashboard/non-consumable)tab.
2. Click the **plus sign** and select **Add Product**.
3. Enter a name and ID for the product. This will create a SurgeGrowth product, which acts as a folder to group all store product IDs under the same entitlements. No operation has happened yet on the stores.
4. Once the product is created, click on **Add Price** to define a price variant for the product. A single product can have multiple price variants to cater to different occasions or experiments. \
*For example, **100 coins** can be sold at **$5** and **$6** simultaneously during an experiment. Each of them are different price variant. Each price variant is linked to a unique store product identifier for each store.*
5. Select the base country and set the base price.
6. Choose a preferred pricing index for parity pricing or use the default index to set regional prices according to App Store pricing.
7. Click on Publish and new product id will be created across all the connected stores. You can see the product\_ids, once the store product is created.
# Import existing products (Coming soon)
# Set parity pricing for imported products & offers
# Create a new product (Coming soon)
# Create an offer (Coming soon)
# Exception - Create app store introductory offer
# Merge products (Coming soon)
# "How-to" demo videos
This documentation includes "How-to" demo videos showcasing key workflows for catalog management by SurgeGrowth.
### Core flows
{% content-ref url="/pages/YOTA1uhl5IZy14z4NRmC" %}
[#1: Create new product with global prices across platforms](/video-demos/1-create-new-product-with-global-prices-across-platforms)
{% endcontent-ref %}
{% content-ref url="/pages/bIdrxAQmATPUIqPMq8xU" %}
[#2: Update localized price for a single product across platforms](/video-demos/2-update-localized-price-for-a-single-product-across-platforms)
{% endcontent-ref %}
{% content-ref url="/pages/oI0HafKMMGIf3hi3dahX" %}
[#3: Create custom price indexes](/video-demos/3-create-custom-price-indexes)
{% endcontent-ref %}
{% content-ref url="/pages/b1wn3NJp8rcWNjkovGRi" %}
[#4: Bulk update prices for multiple products (Both IAP and subscriptions)](/video-demos/4-bulk-update-prices-for-multiple-products-both-iap-and-subscriptions)
{% endcontent-ref %}
{% content-ref url="/pages/tco8uJBYcRp9jLT0MvMQ" %}
[#5: Bulk import existing IAP products](/video-demos/5-bulk-import-existing-iap-products)
{% endcontent-ref %}
{% content-ref url="/pages/P0UCg6Ol9dVyP04GnULB" %}
[#6: Update price index to regularly update currency exchange rate](/video-demos/6-update-price-index-to-regularly-update-currency-exchange-rate)
{% endcontent-ref %}
For demos of additional workflows, feel free to reach out to us at
# #1: Create new product with global prices across platforms
{% embed url="" %}
Step by step guide
Step 1: Begin by naming your new product.

Step 2: Choose your base country, set the base price and pick a pricing index

Step 3: Select the payment processors where you want to create these prices.

By clicking "Create Product", we will initiate a backend operation to set up these products and prices across stores.
Simply copy product ids for each store and use them in your app
# #2: Update localized price for a single product across platforms
{% embed url="" %}
Step by step guide
Step 1: Click on the Update icon.

Step 2: Select the new price.

Note: We'll recalculate the price for each country based on the new price you select.
Step 3: Review the recalculated prices and click Next.
Step 4: Choose the platforms where you want to implement these price changes and click Change Prices to finalize the updates.

After completing these steps, you'll see the updated prices.
You'll also be able to view the history of your price updates.

# #3: Create custom price indexes
{% embed url="" %}
Step by step guide
Step 1: To begin go-to price index tab and click on create new price index CTA.

Step 2: Name your new custom index and choose the base template you'd like to modify.

Step 3: The base price multiple for the chosen template will load. Adjust this multiple according to your requirements.

Step 4: After making your edits, click on 'Create'.
Step 5: Your new index is now created and ready for use.
# #4: Bulk update prices for multiple products (Both IAP and subscriptions)
{% embed url="" %}
Step by step guide
**Step 1:** Begin by clicking on the **Change Price** option.
**Step 2:** Select the products you wish to update. Use the search function to find specific products.
**Step 3:** On the following screen, update the base price for each product.
If there's a product you don't wish to change, leave it as is.
**Step 4:** We'll then ask you to select a price index. Choose the one that best suits your needs. For this example, we'll use the Netflix Price Index. "Click Next"
**Step 5:** Decide whether you want to make the price update go live immediately or schedule it for later.
**Step 6:** Review and confirm your changes..
# #5: Bulk import existing IAP products
{% embed url="" %}
Step by step guide
Step 1: Click on the three dots and select Bulk Import.

Step 2: Upload a CSV file of your existing products, which should include the product ID of each platform.
Step 3: After uploading the file, map the file columns with the required columns in SurgeGrowth.

Step 4: Once you've mapped the columns, click on Next.
Step 5: SurgeGrowth will then validate the information in the sheet and provide a summary. If you're satisfied with the summary, proceed. If not, click on Edit to make changes. To continue, click on Import Products.
Step 6: After the import is complete, you'll see the status of the import and all the products. Products with a successful status will be visible.

And that's it! You've successfully imported your products in bulk.
# #6: Update price index to regularly update currency exchange rate
{% embed url="" %}
# App Store In-app Purchase API key
To generate App Store In-app Purchase API key, follow these steps:
1. Open **App Store Connect**. Proceed to [**Users and Access** → **Integrations** → **In-App Purchase**](https://appstoreconnect.apple.com/access/integrations/api/subs) section. *If you don't see In-app purchase section then ask your App Store admin to help you.*
2. Then click the **Plus (+)** button next to the **Active** title. The **Generate *****App Store Connect** API* **Key** window will open.
3. Enter the name of the key for your future reference (this name is not used in SurgeGrowth).
4. Set Access level to **App Manager**\
5. Click the **Generate** button. Once the **Generated,** window closes, you'll see the created key in the **Active** list.
6. After generating your API key, click the **Download App Store Connect API Key** button to get the key as a file.\
*Keep this file safe to later upload it to SurgeGrowth. Please keep in mind that the generated file can be downloaded only once, so store it safely until you upload it to SurgeGrowth.*
7. Copy the values of **Issuer ID** and **Key ID** fields from this screen as well. Later you will use them in SurgeGrowth.
# Google Play Store credentials
To generate Google Play Store credentials, follow these steps:
### 1. Enable APIs in the Google Cloud Console[](https://adapty.io/docs/service-account-key-file#1-enable-apis-in-the-google-cloud-console)
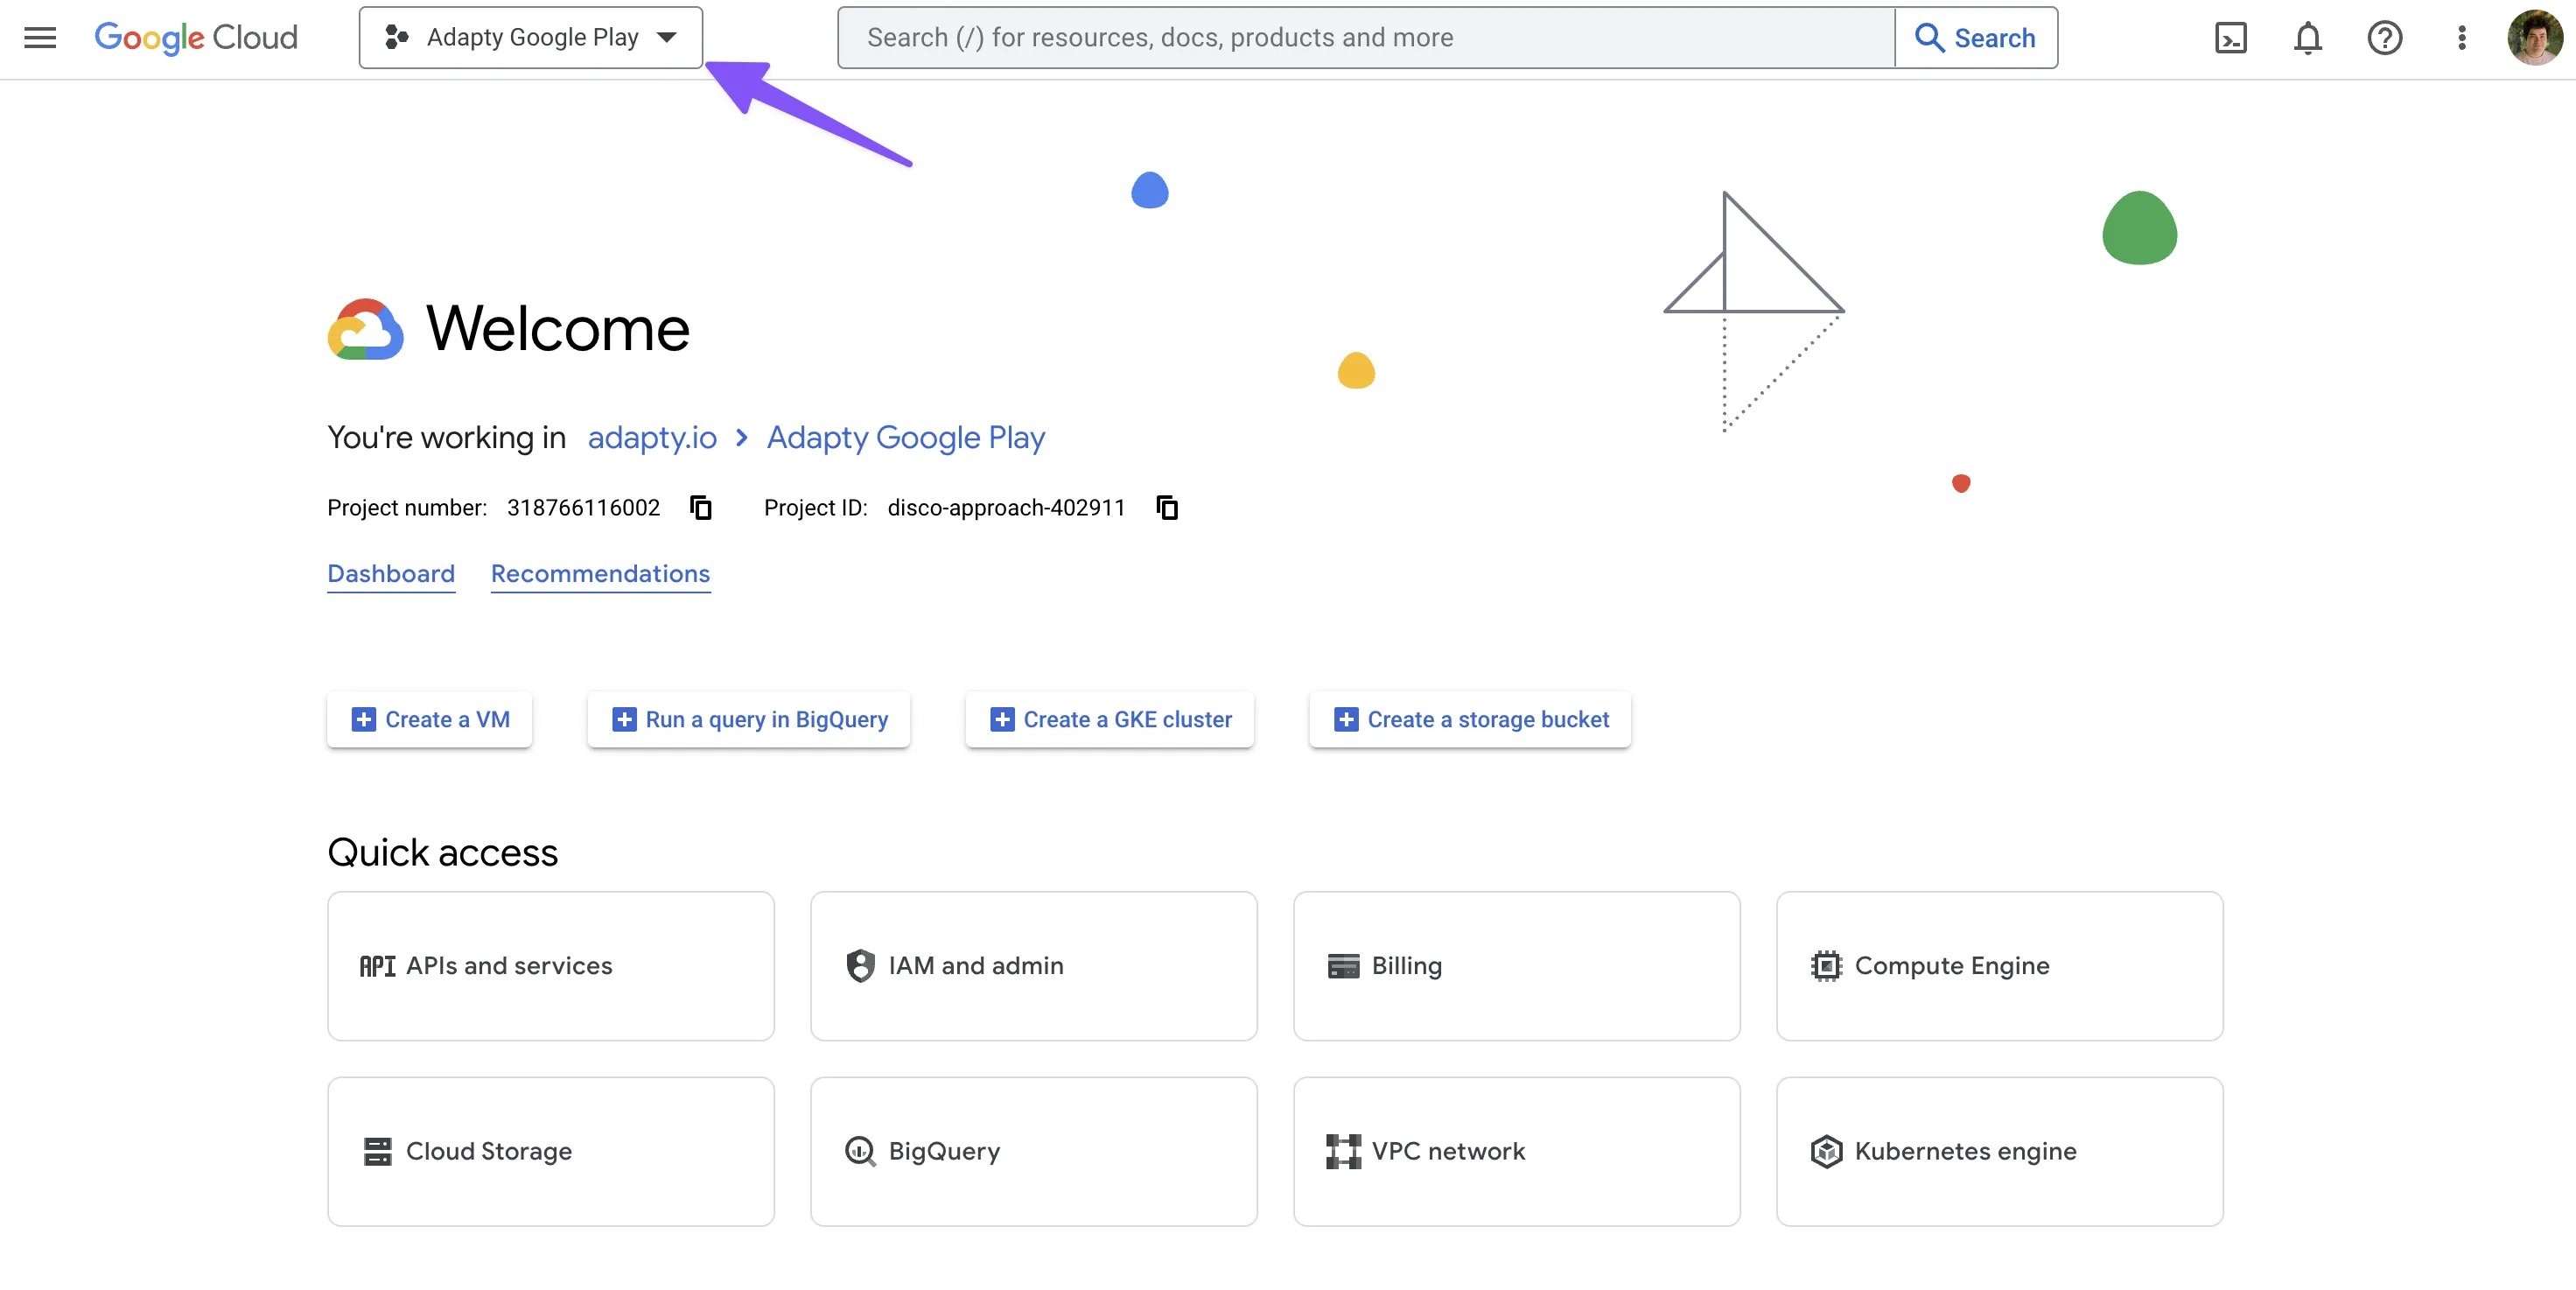
1. Select the [Google Cloud Project](https://console.cloud.google.com/welcome) you want to use or create a new one. Please make sure to use the same Google Cloud Project during all the steps of this guide.
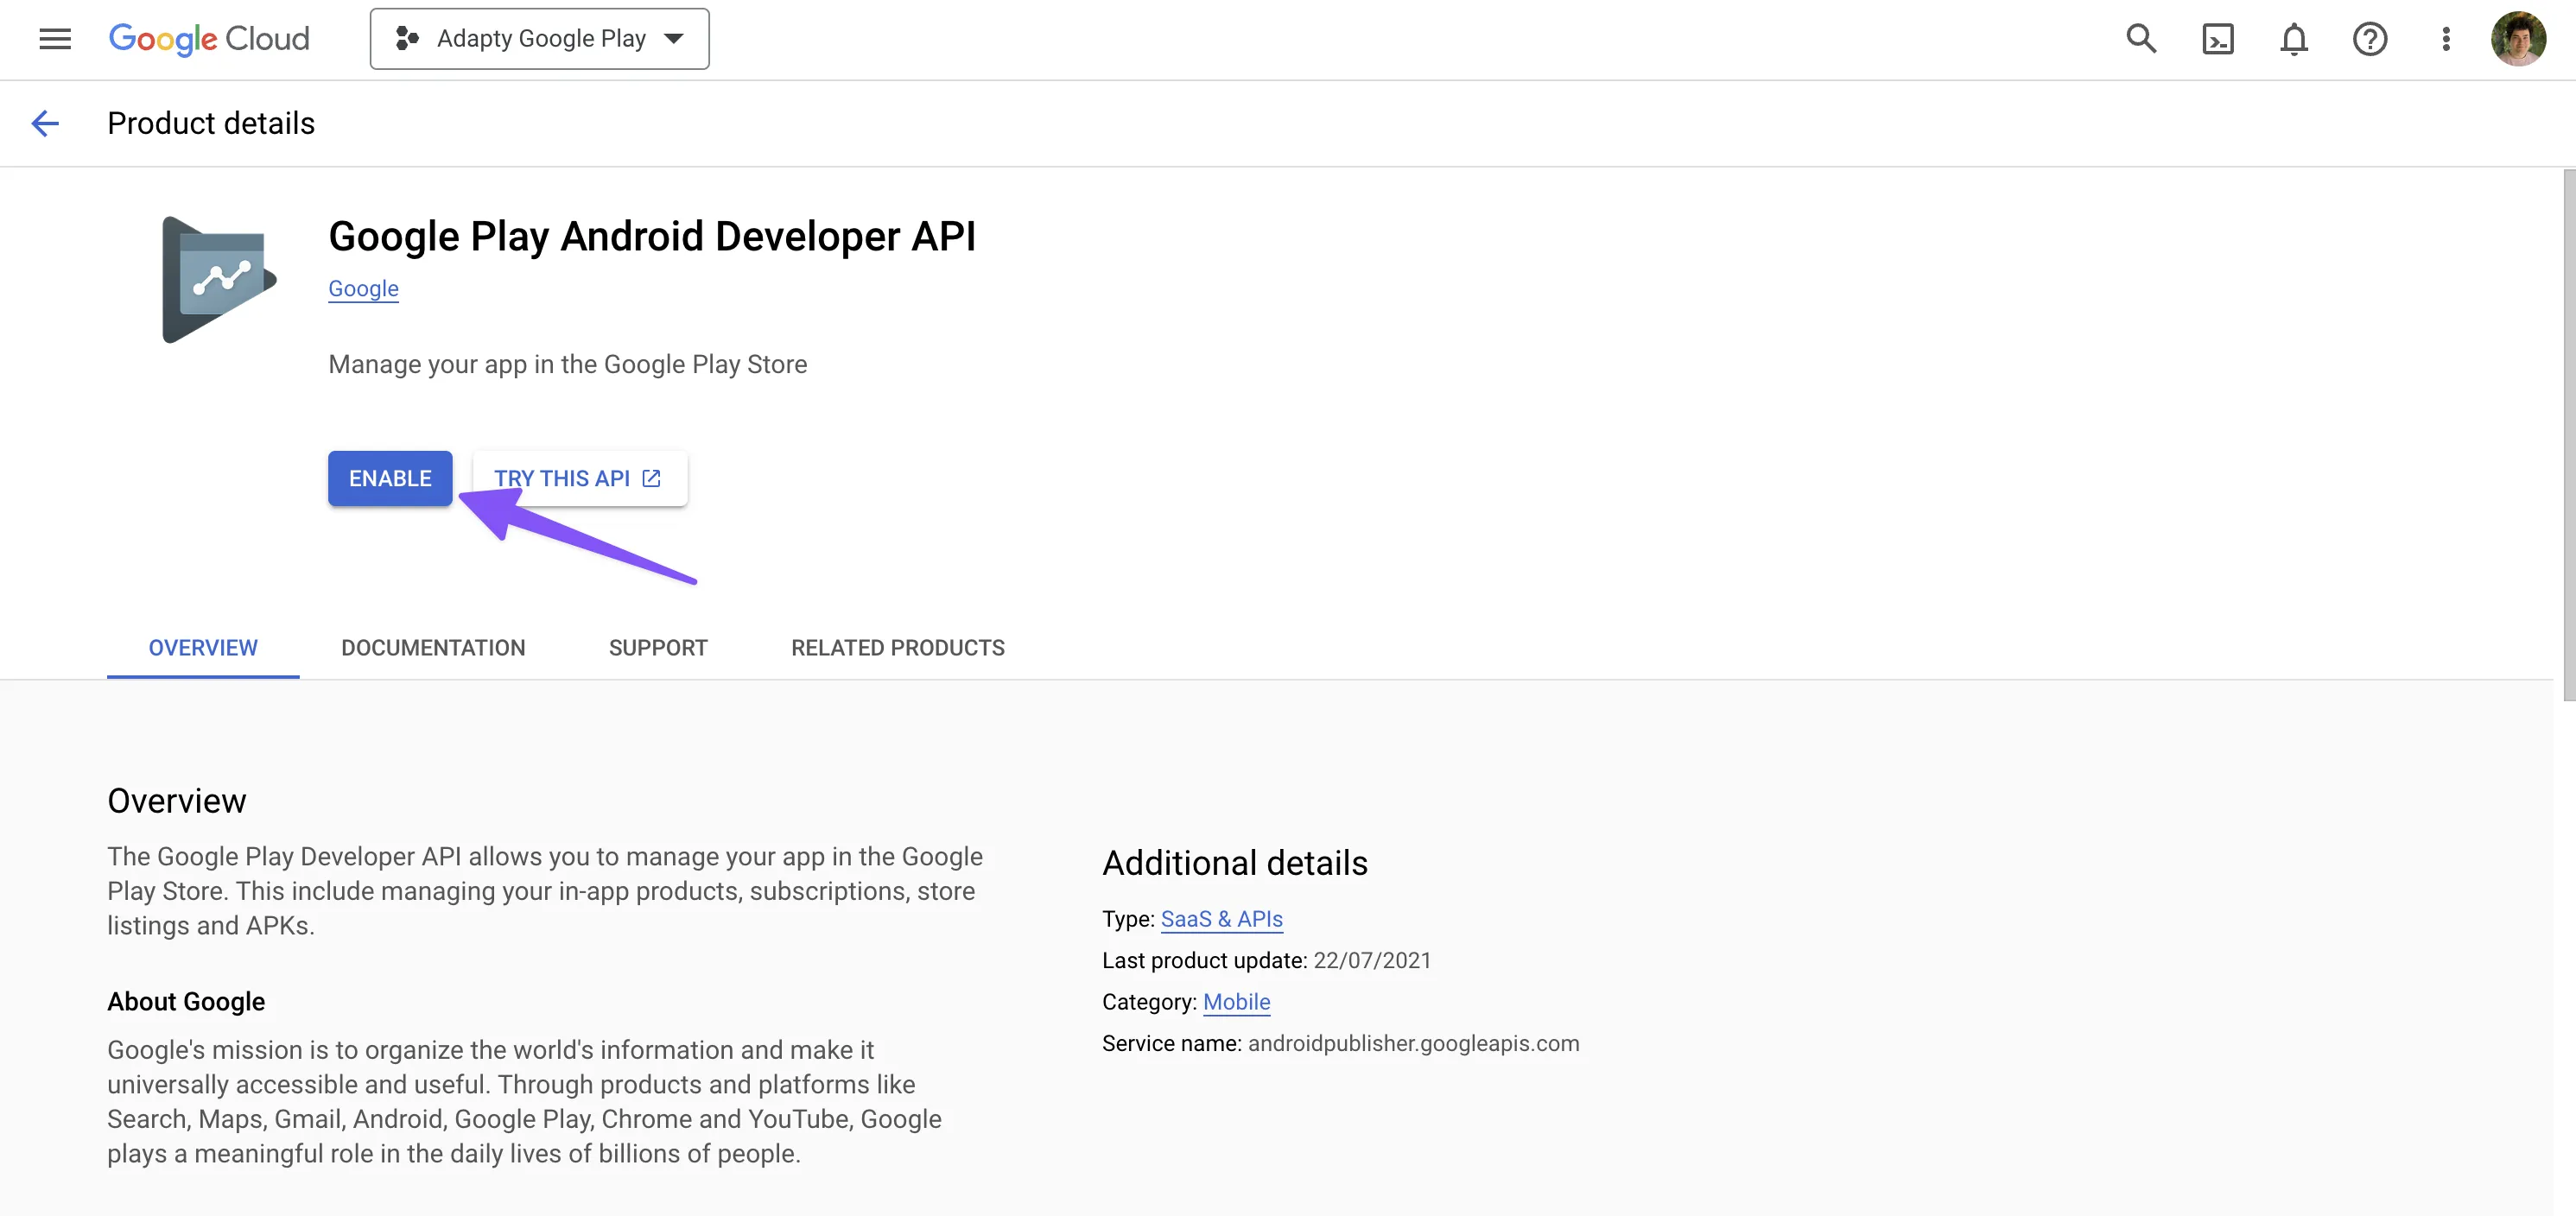
2. Go to the [Google Play Android Developer API](https://console.cloud.google.com/apis/library/androidpublisher.googleapis.com) page and click **Enable**.
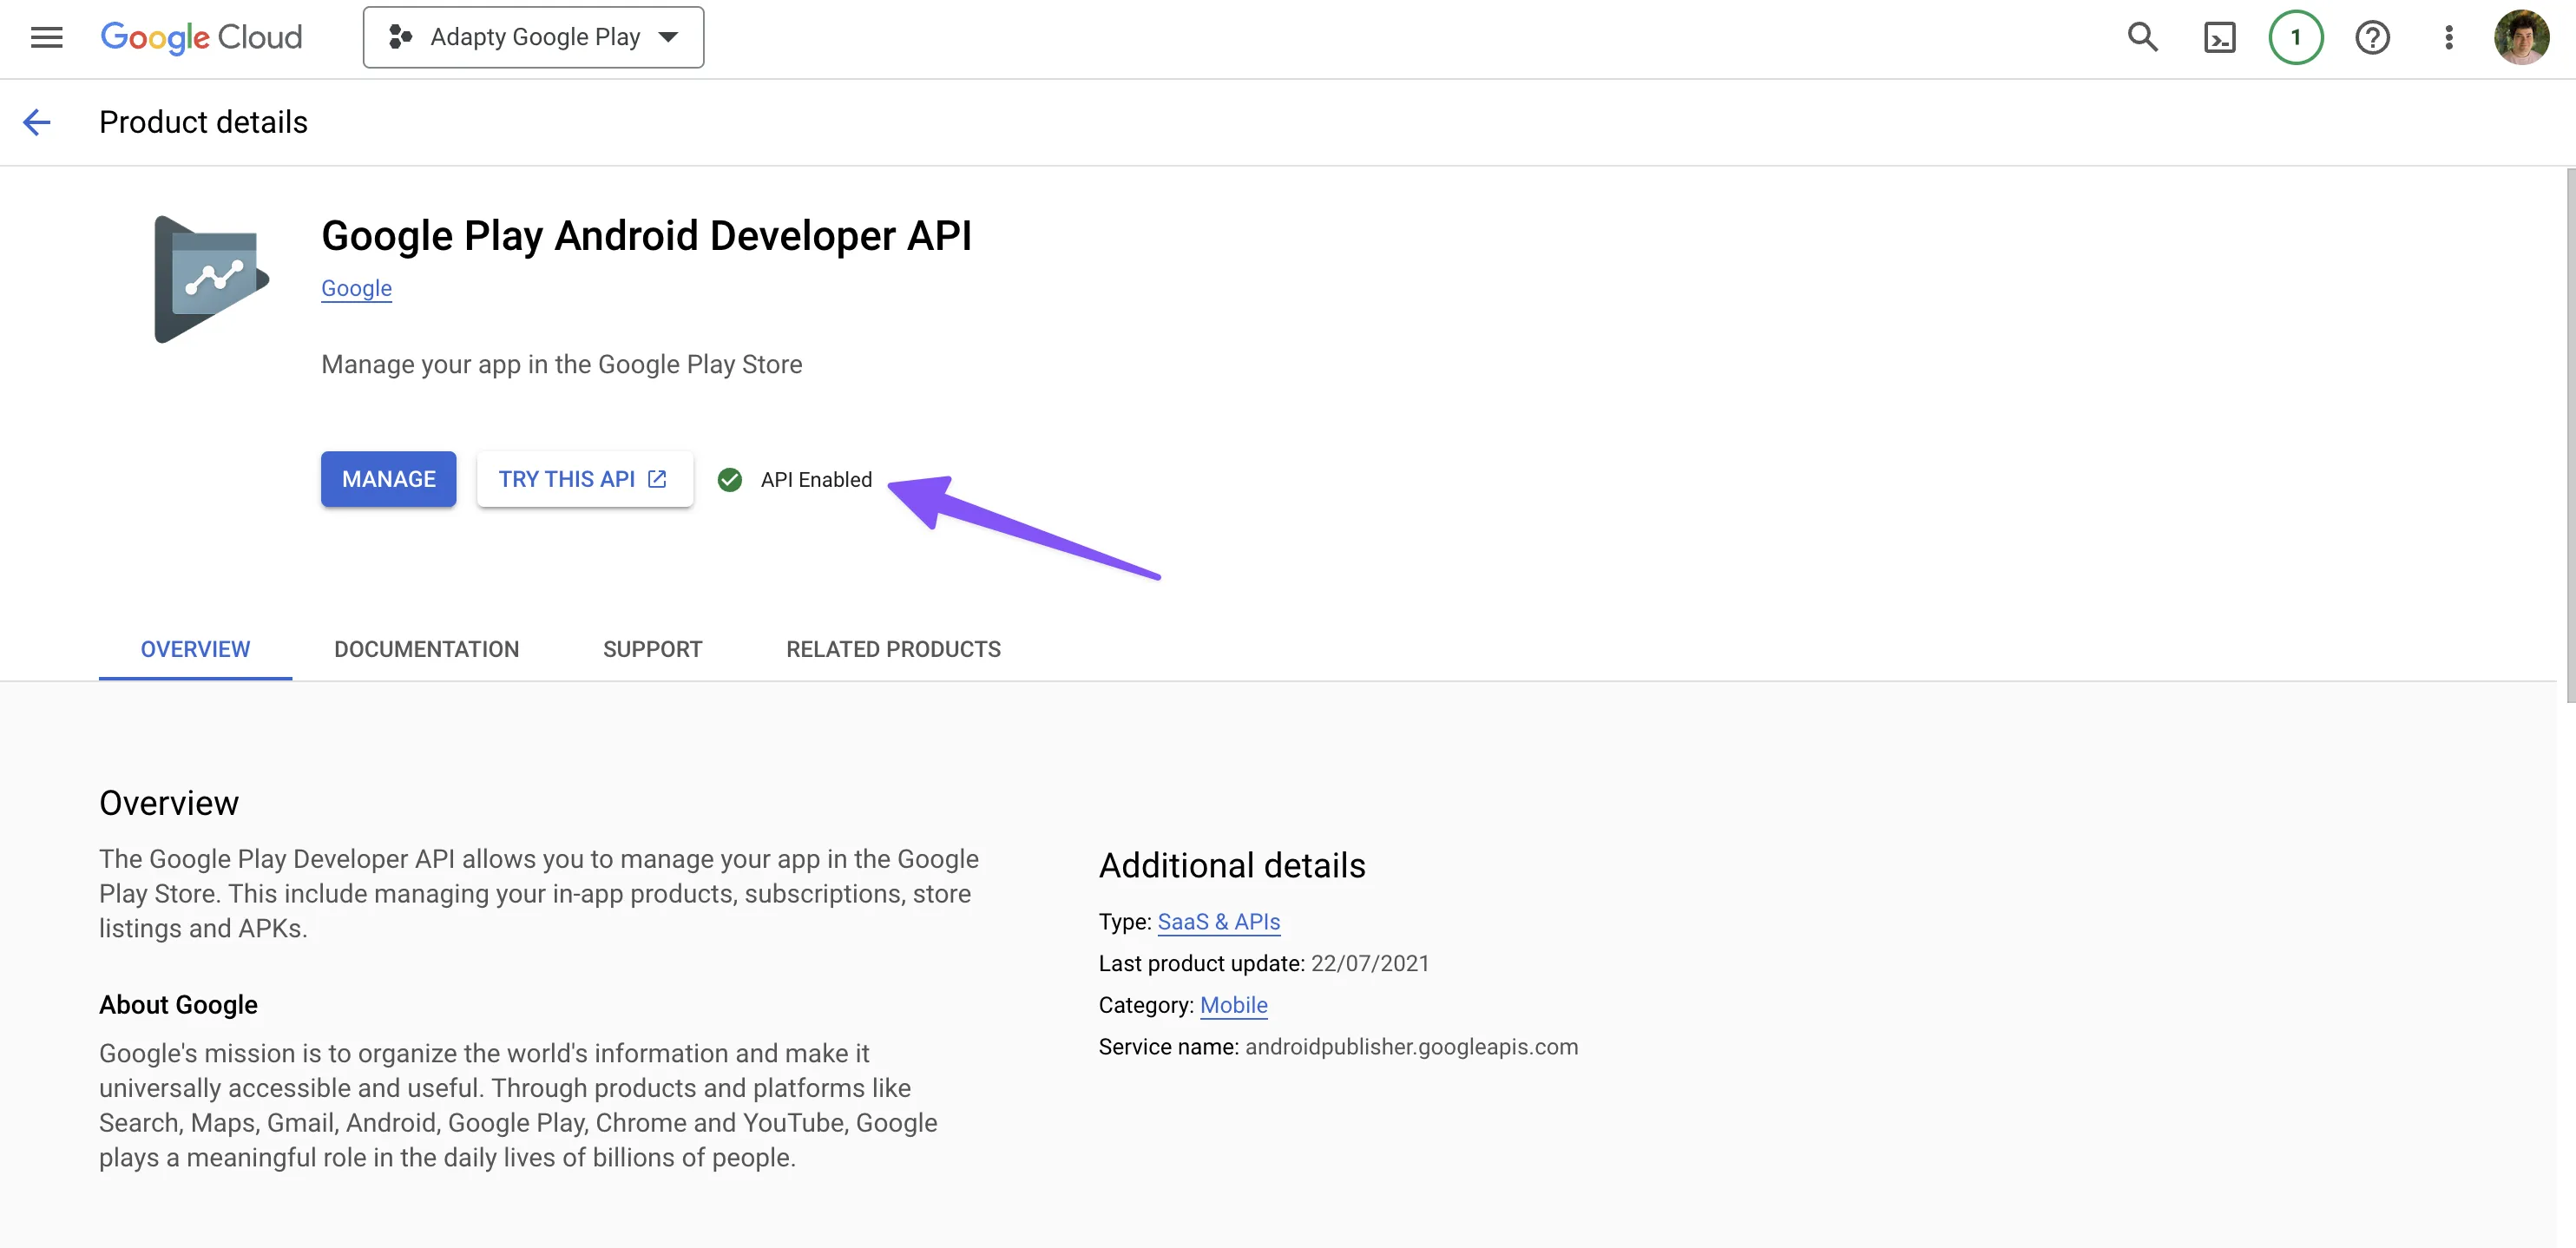
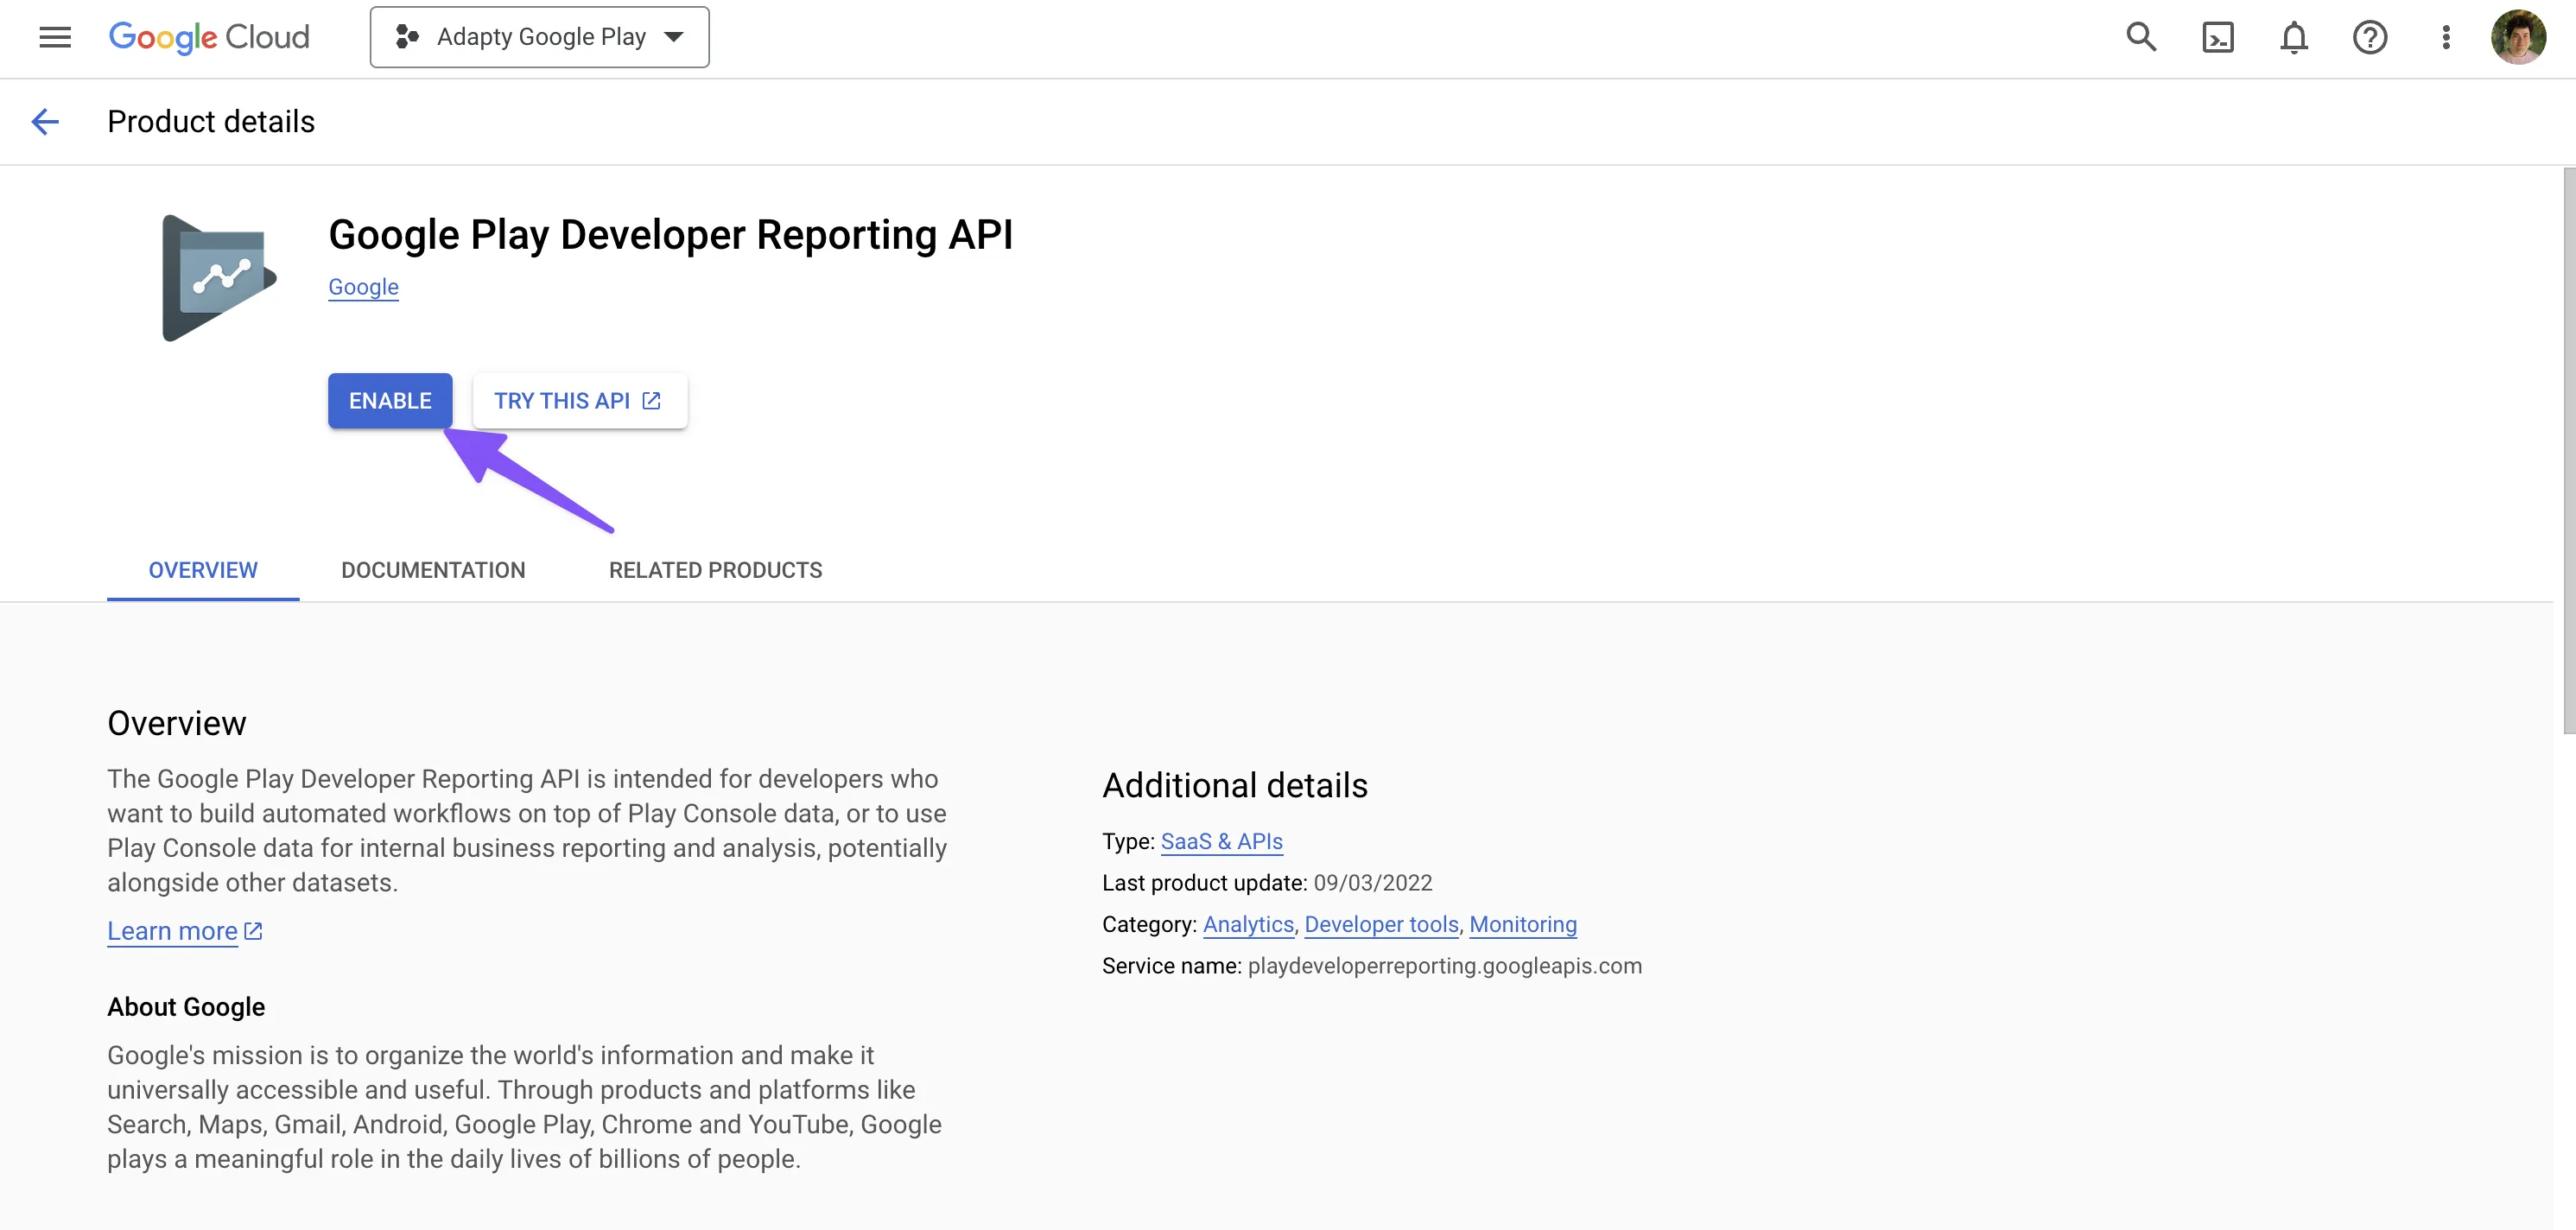
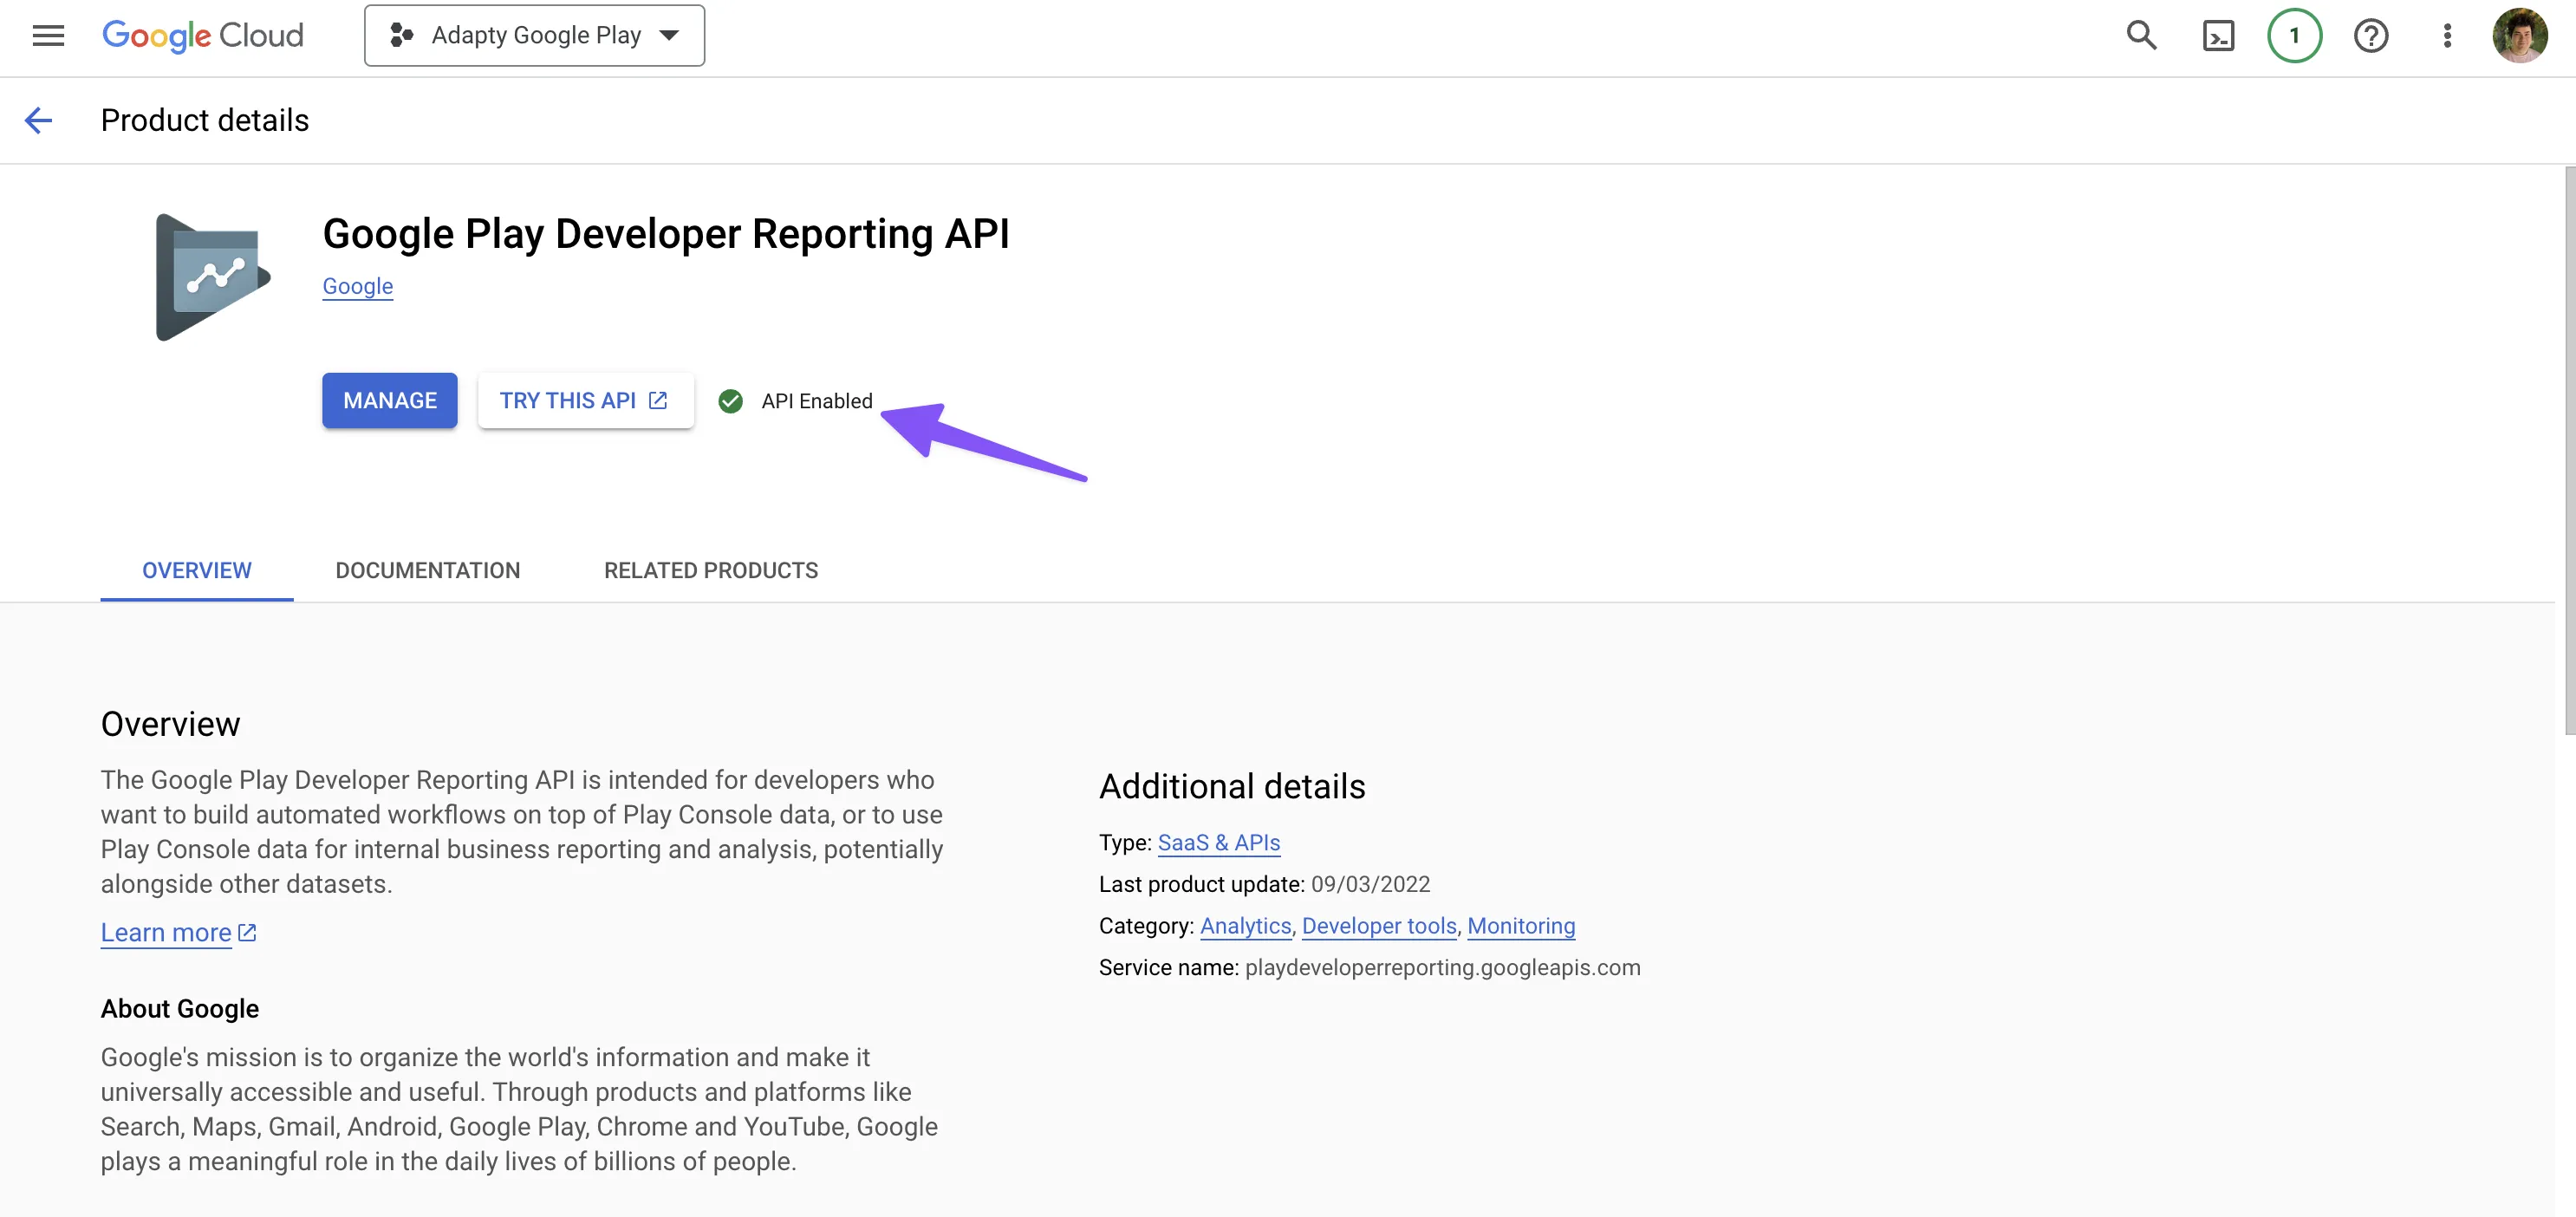
3. Go to the [Google Play Developer Reporting API](https://console.cloud.google.com/apis/library/playdeveloperreporting.googleapis.com) page and click **Enable**.
### 2. Create a Service account in the Google Cloud Console[](https://adapty.io/docs/service-account-key-file#2-create-a-service-account-in-the-google-cloud-console)
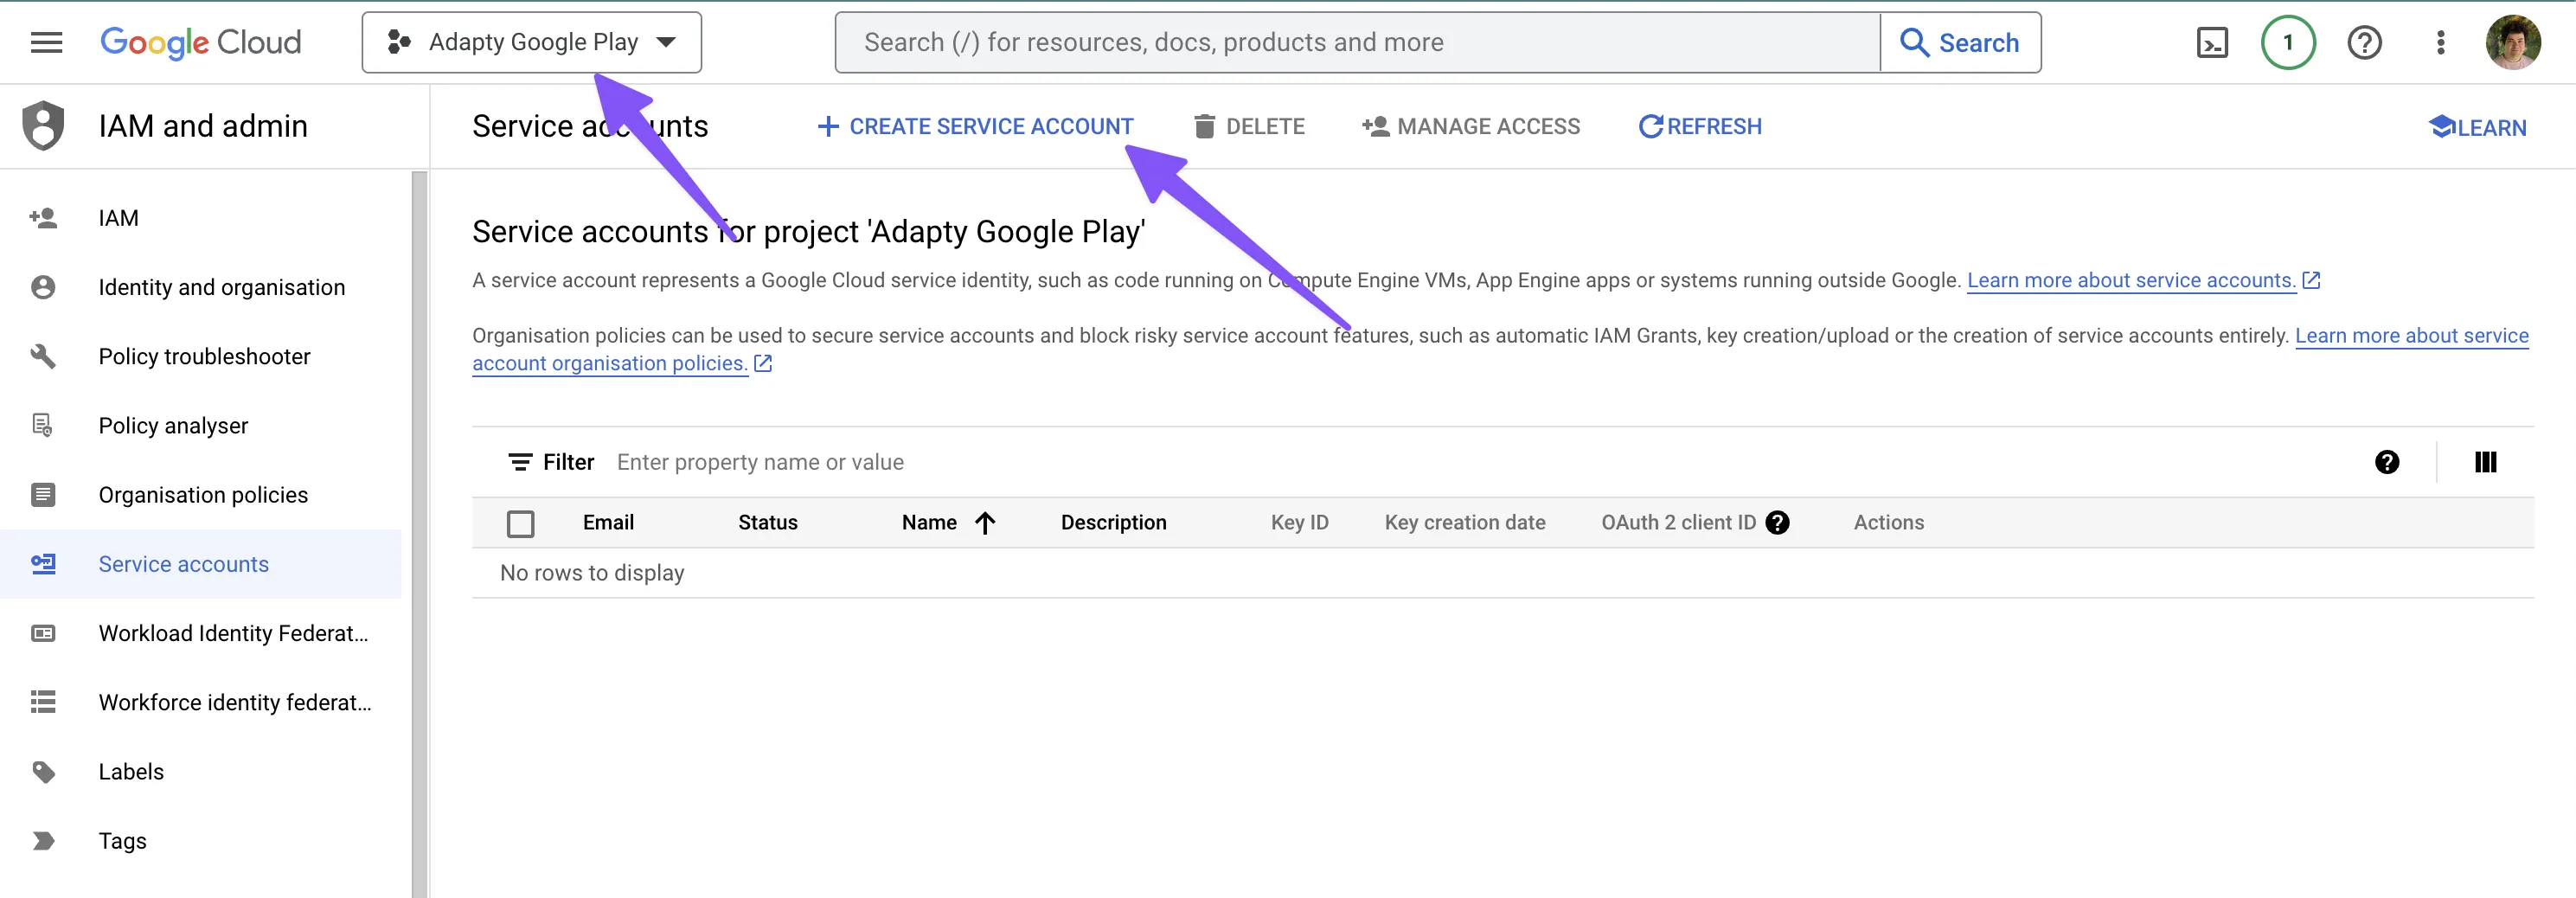
1. Go to Google Cloud Console -> IAM & Admin -> [Service accounts](https://console.cloud.google.com/iam-admin/serviceaccounts). Please make sure to use the same Google Cloud Project you used in the previous steps. Click **Create Service Account**.
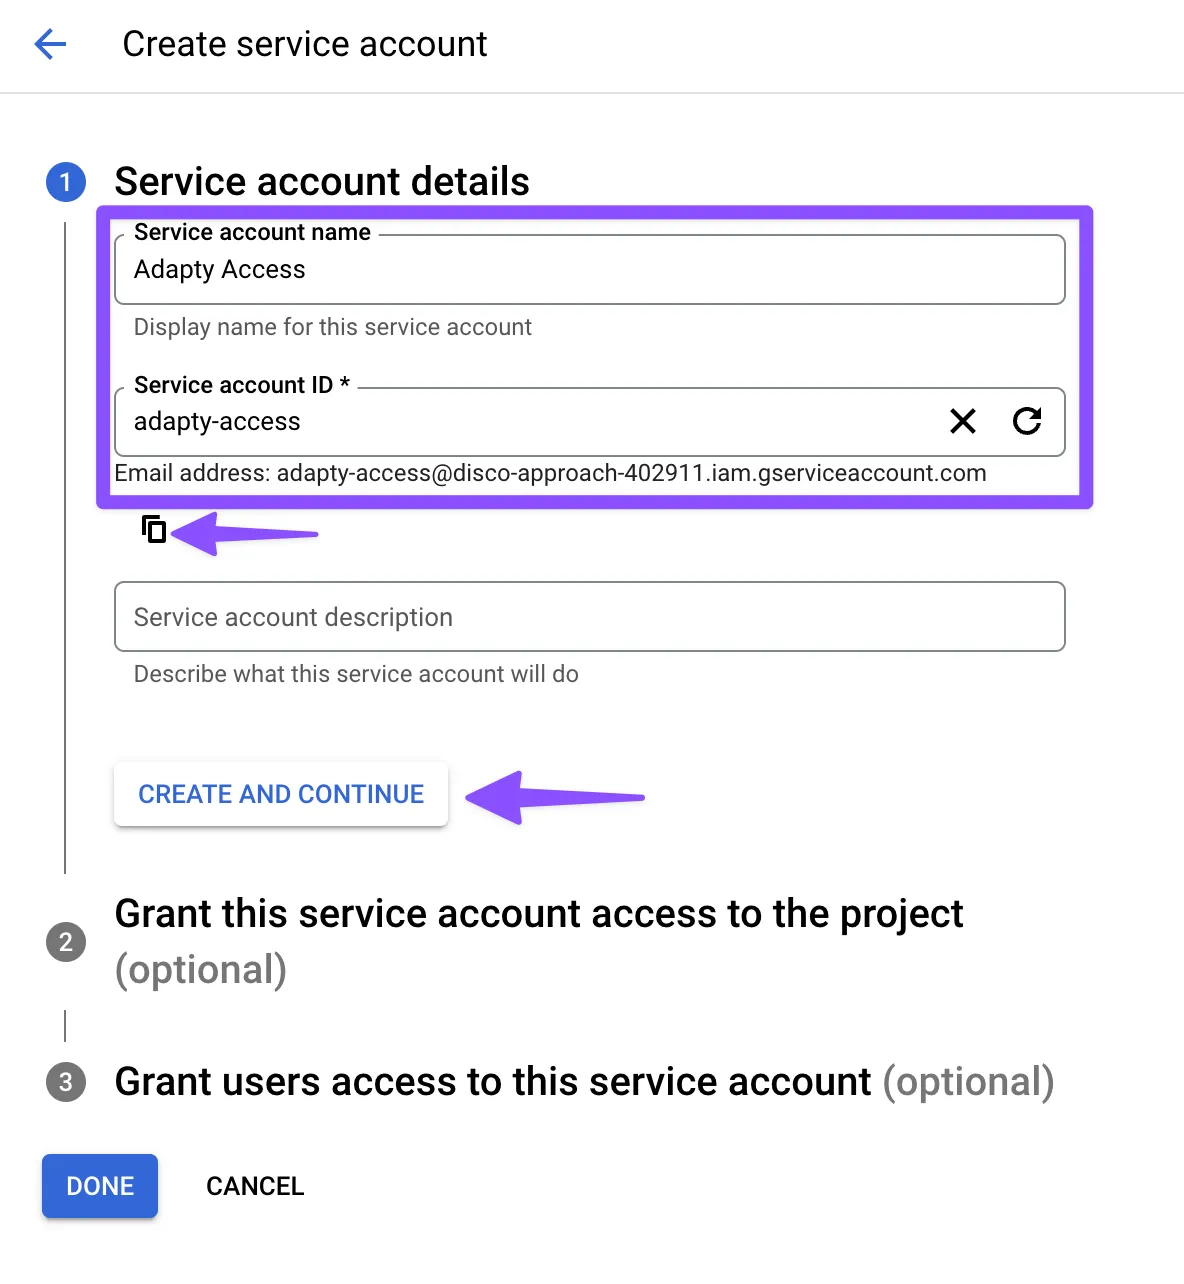
2. Enter its name and copy its **ID** (email address) for future use. Click **Create and Continue**.
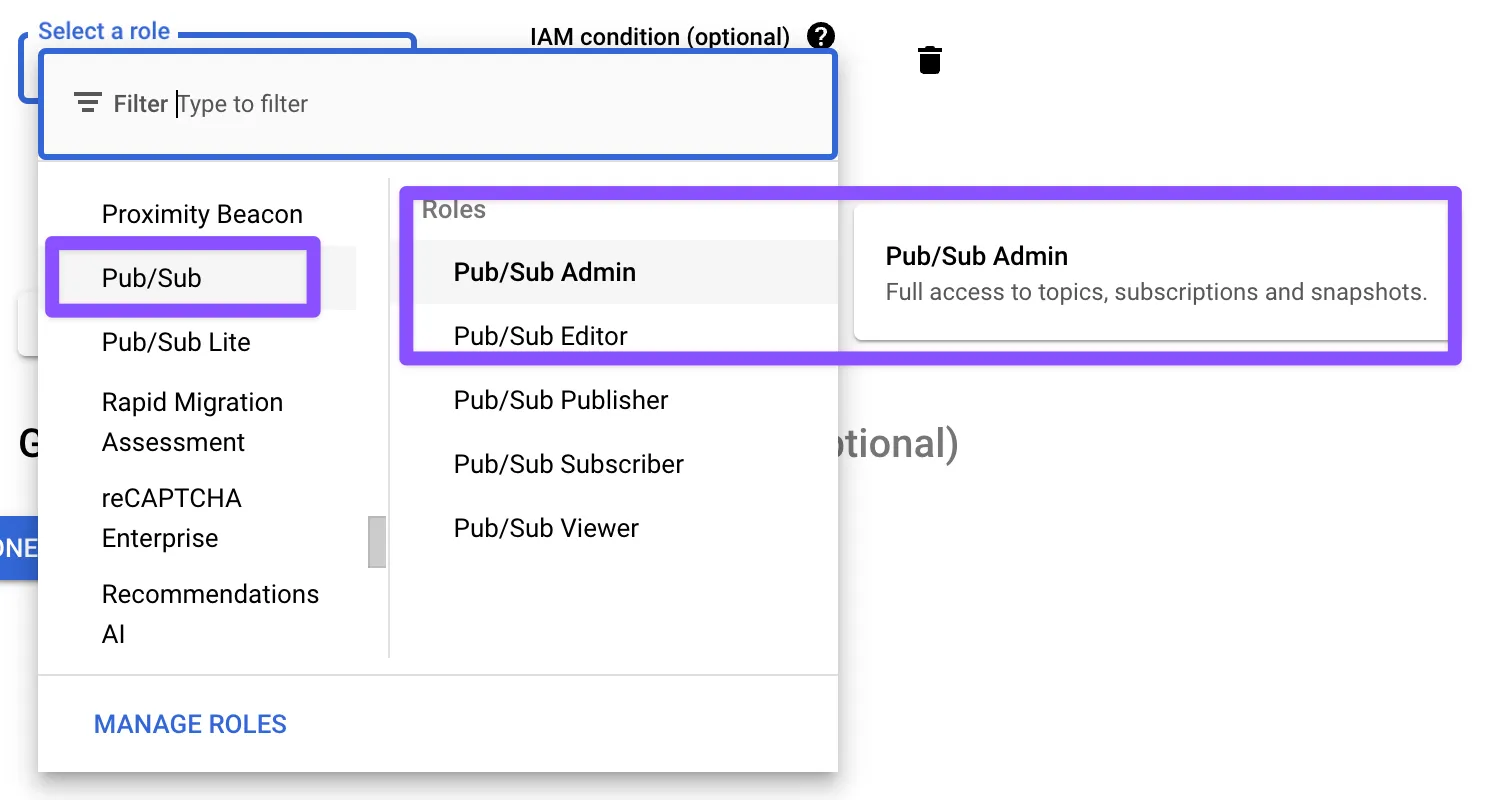
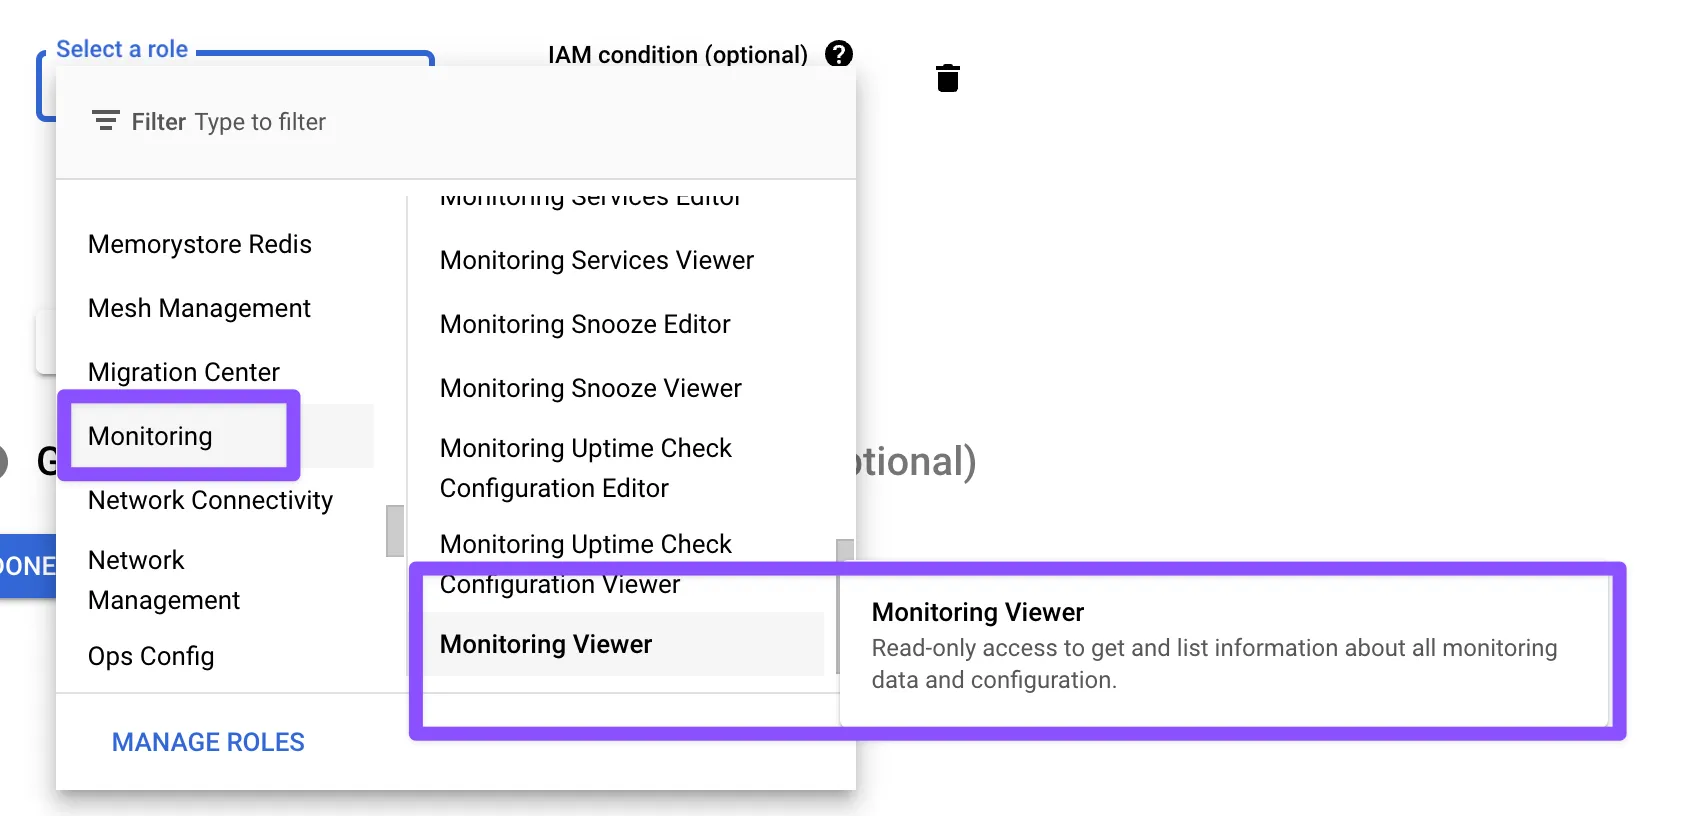
3. In the next step you should add one **Role**:
* Monitoring Viewer (to allow monitoring of the notification queue).
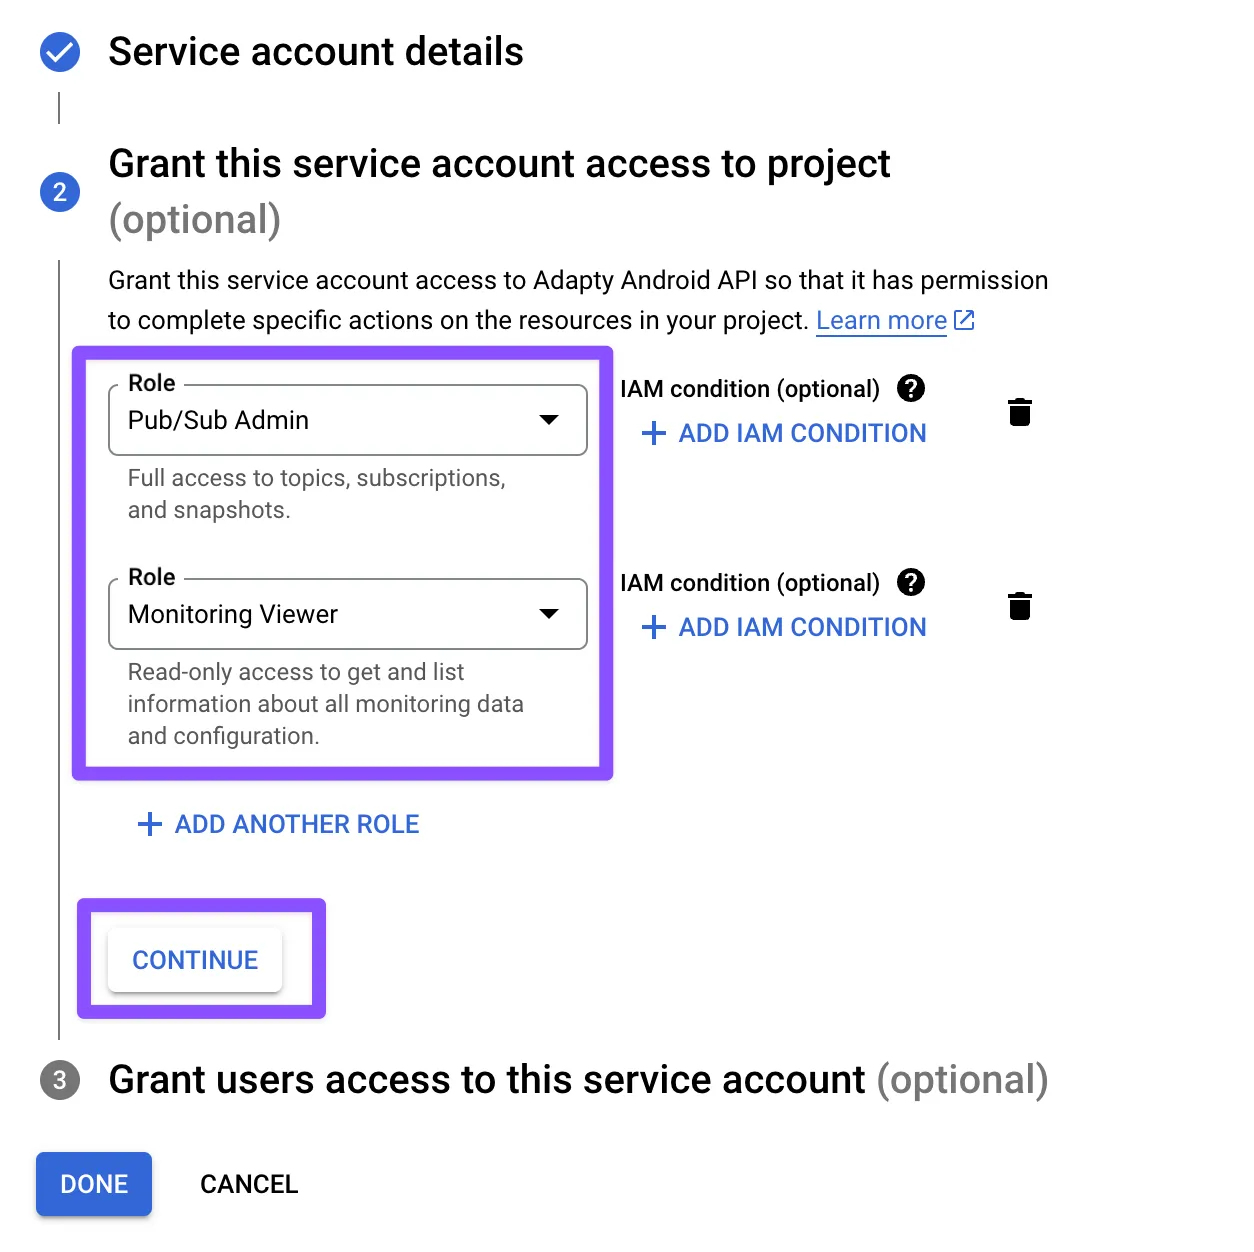
4. Don't enter anything in this step and click **Done**.
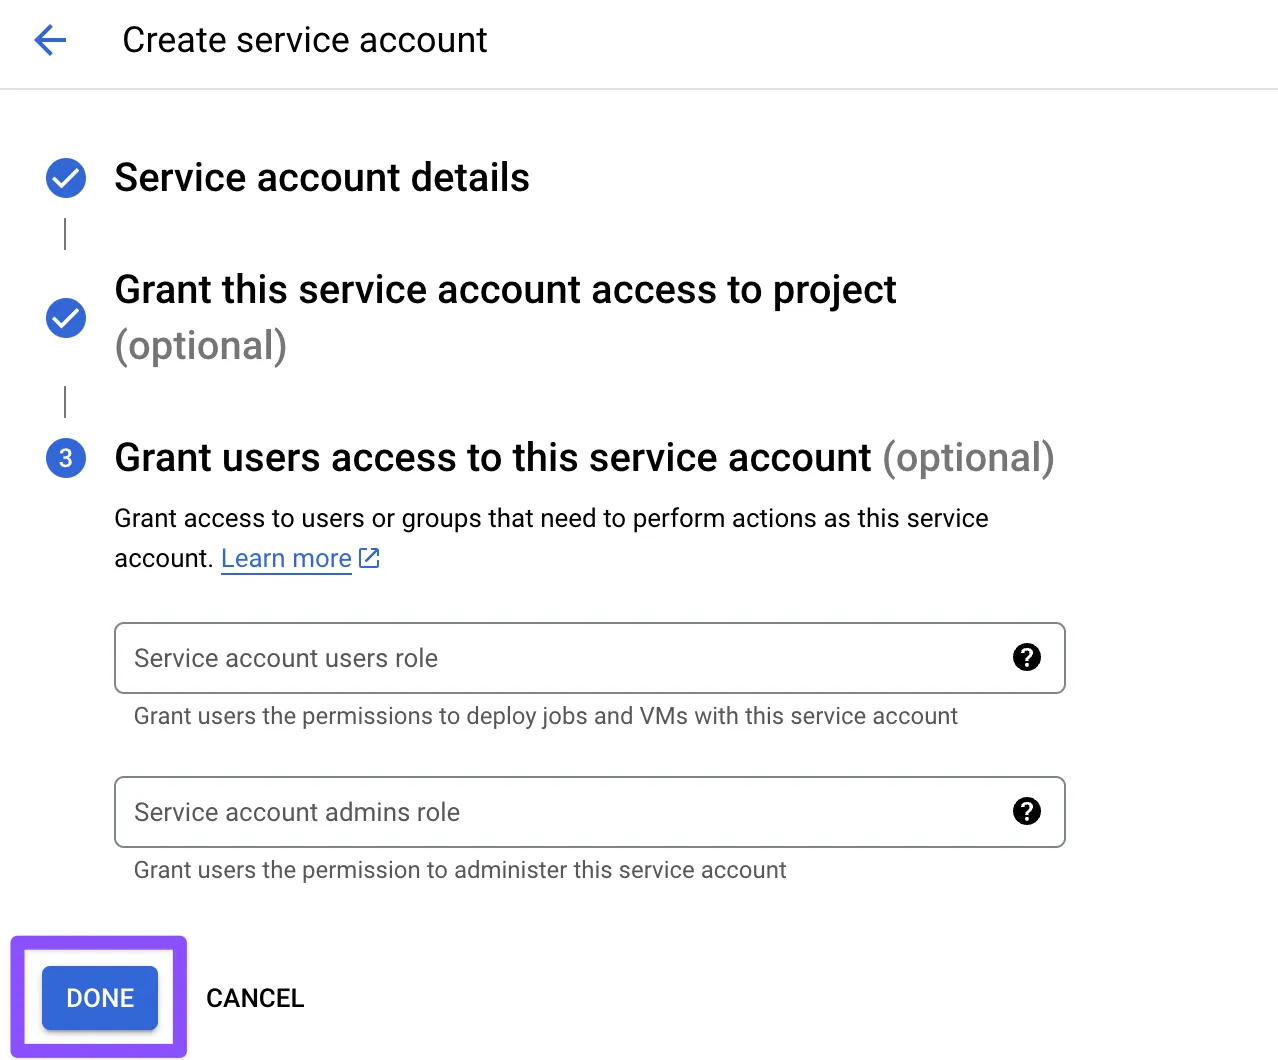
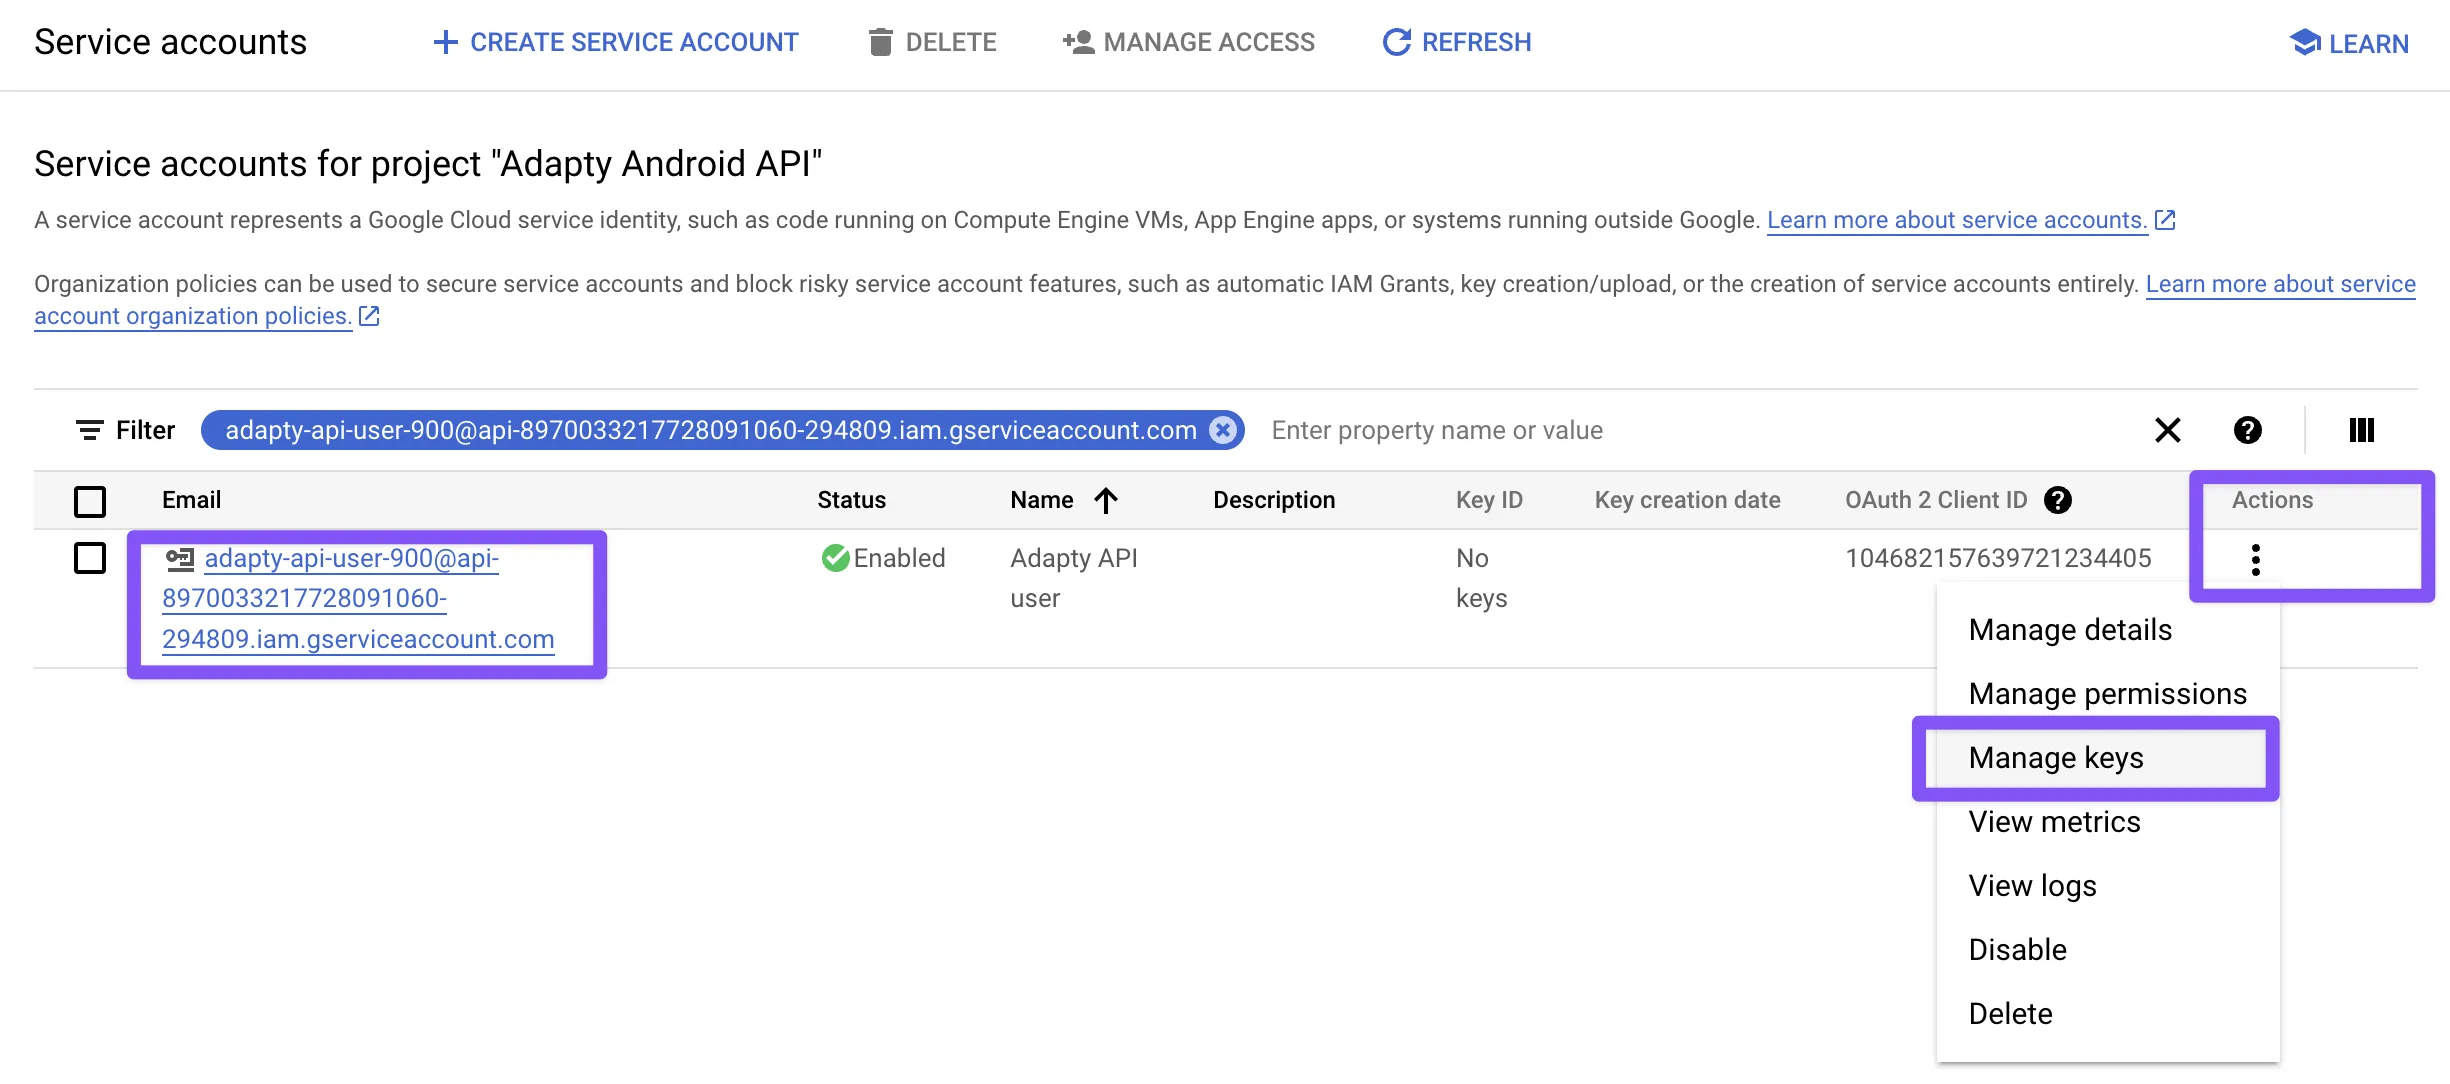
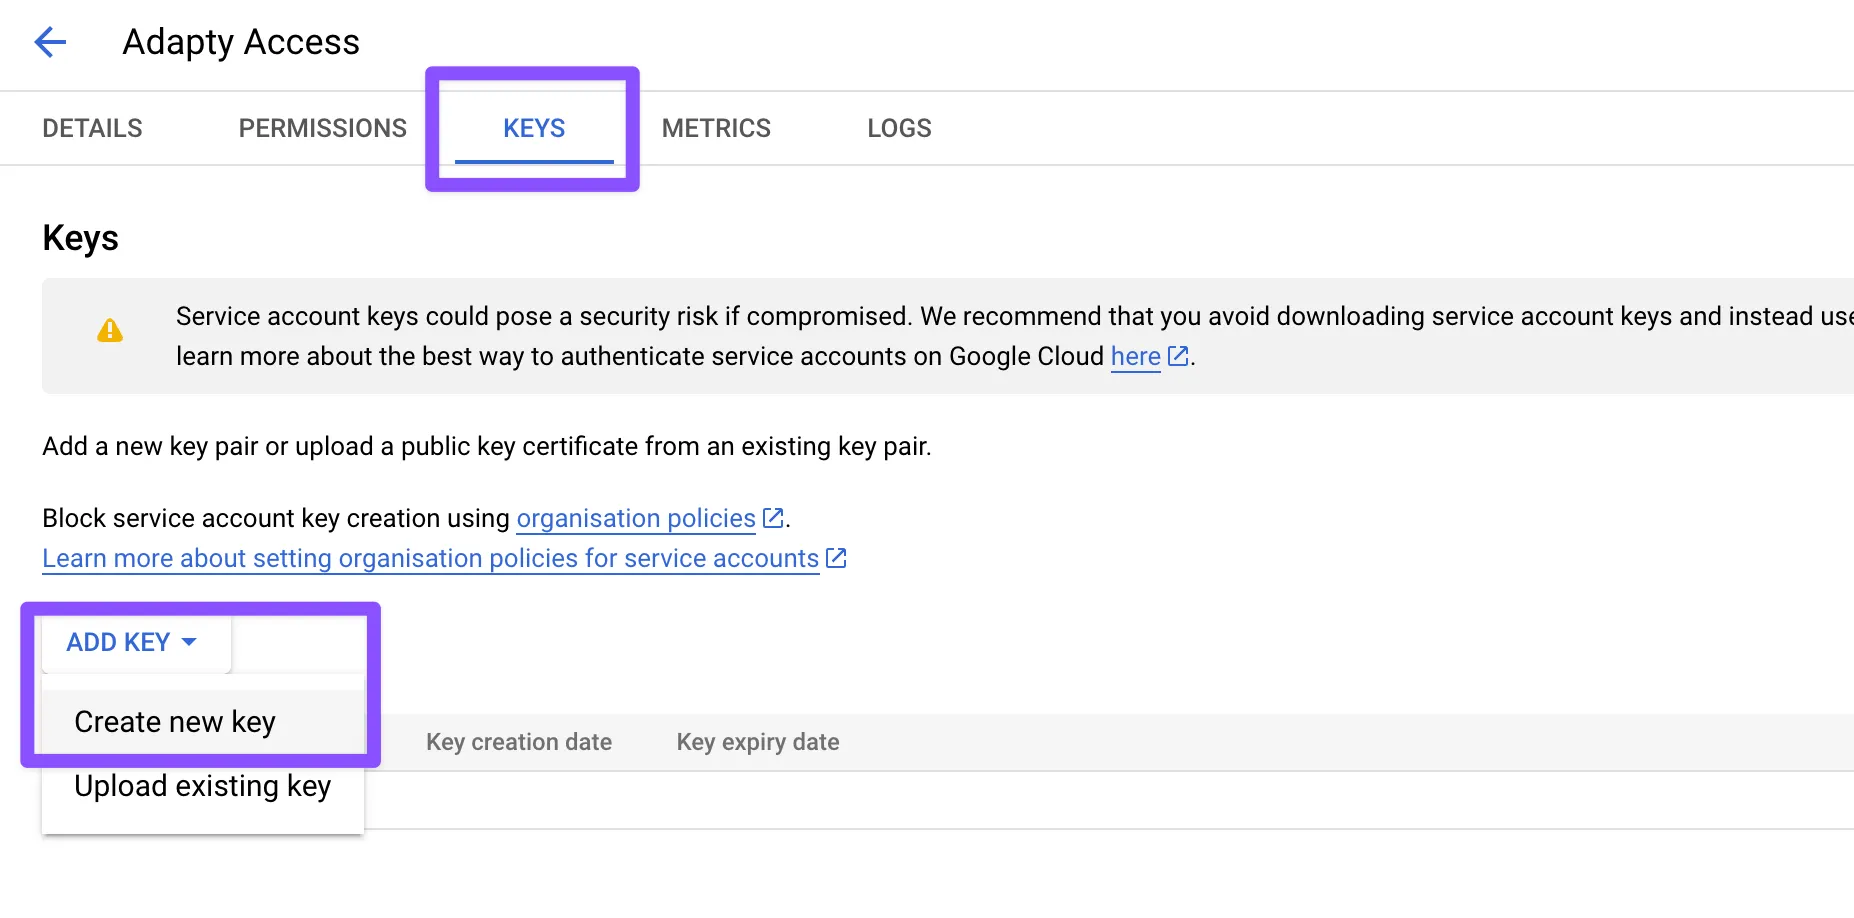
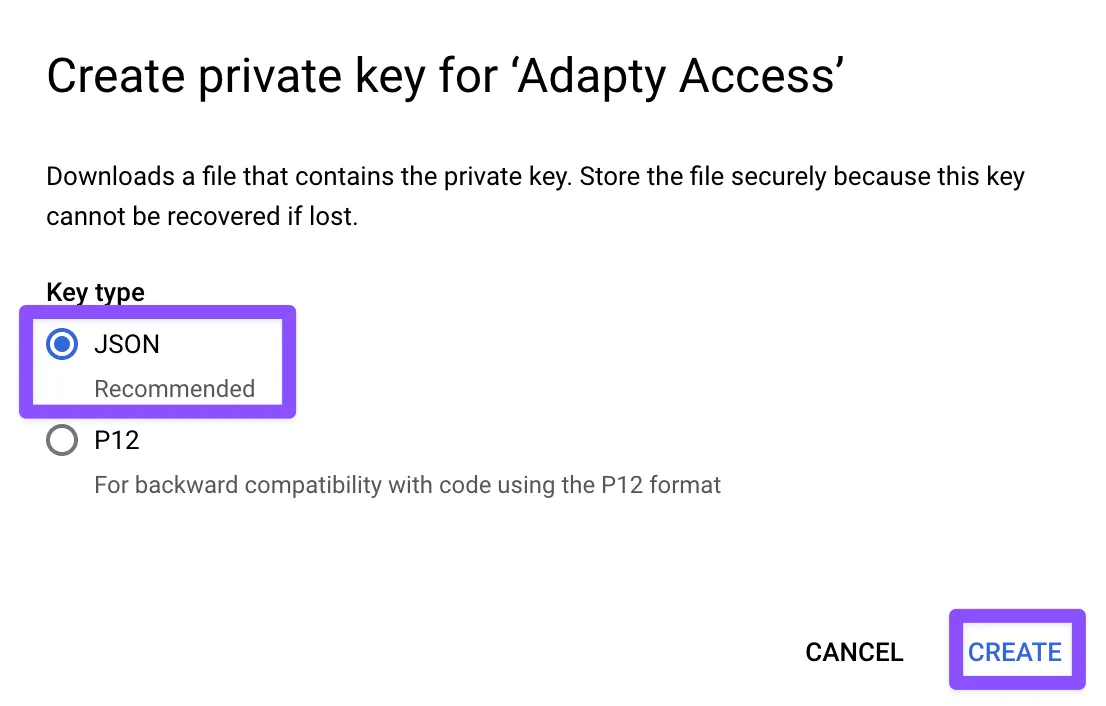
5. Find the newly created account in the list and in the actions click **Manage keys**. Create a new JSON key and save it locally on your computer. This is the key you will upload to the SurgeGrowth Dashboard.
### 3. Grant permissions in the Google Play Console[](https://adapty.io/docs/service-account-key-file#3-grant-permissions-in-the-google-play-console)
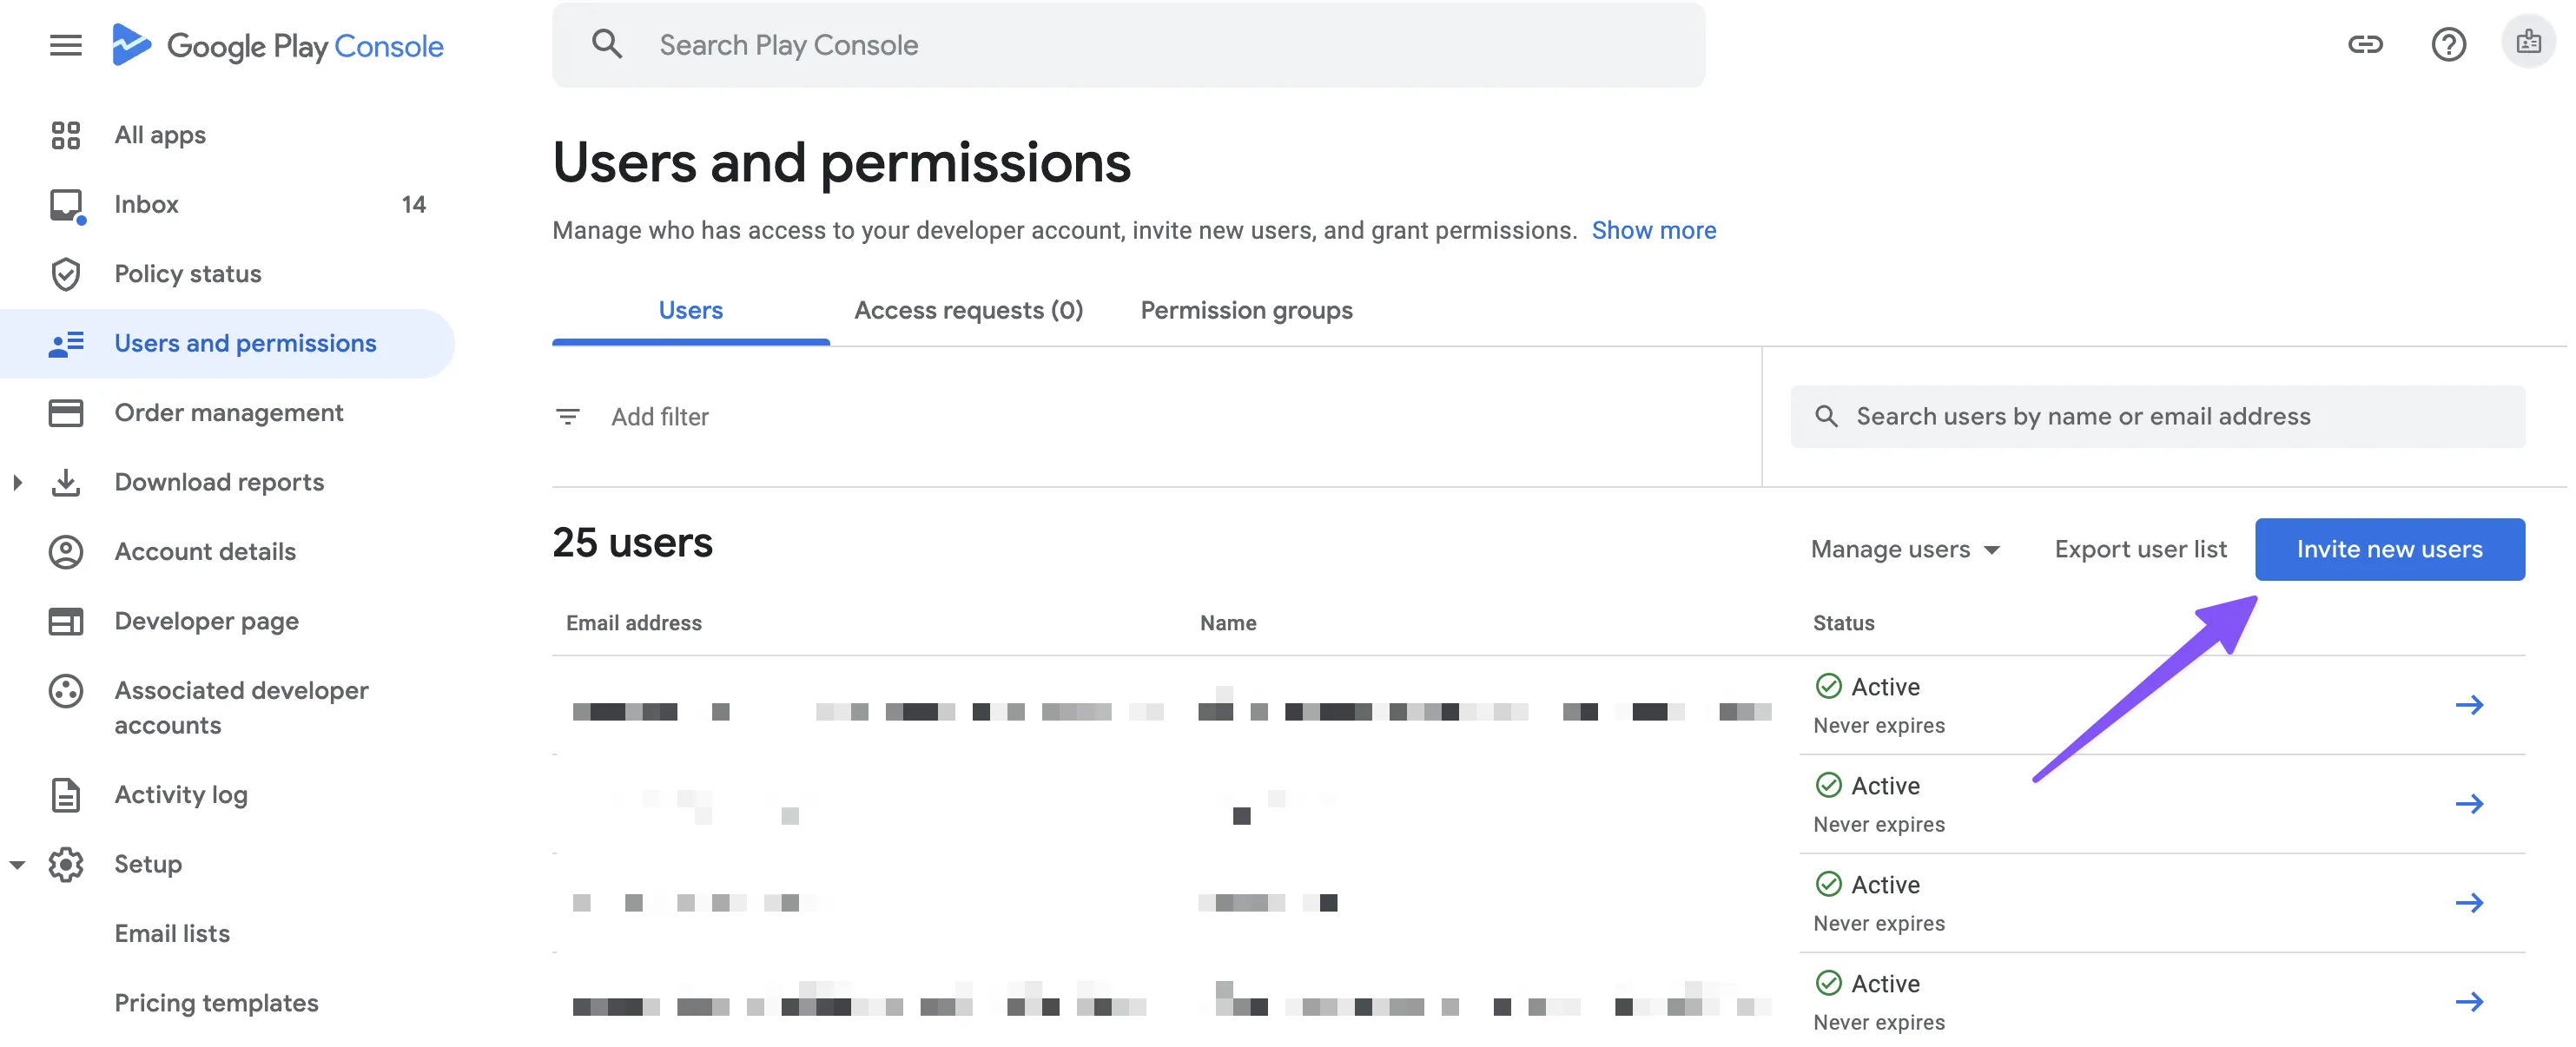
1. Go to the [**Users and permissions**](https://play.google.com/console/u/0/developers/users-and-permissions) page in the Google Play Console and click **Invite new users**.
2. Enter the email of the service account you've created in section 2 of this guide.
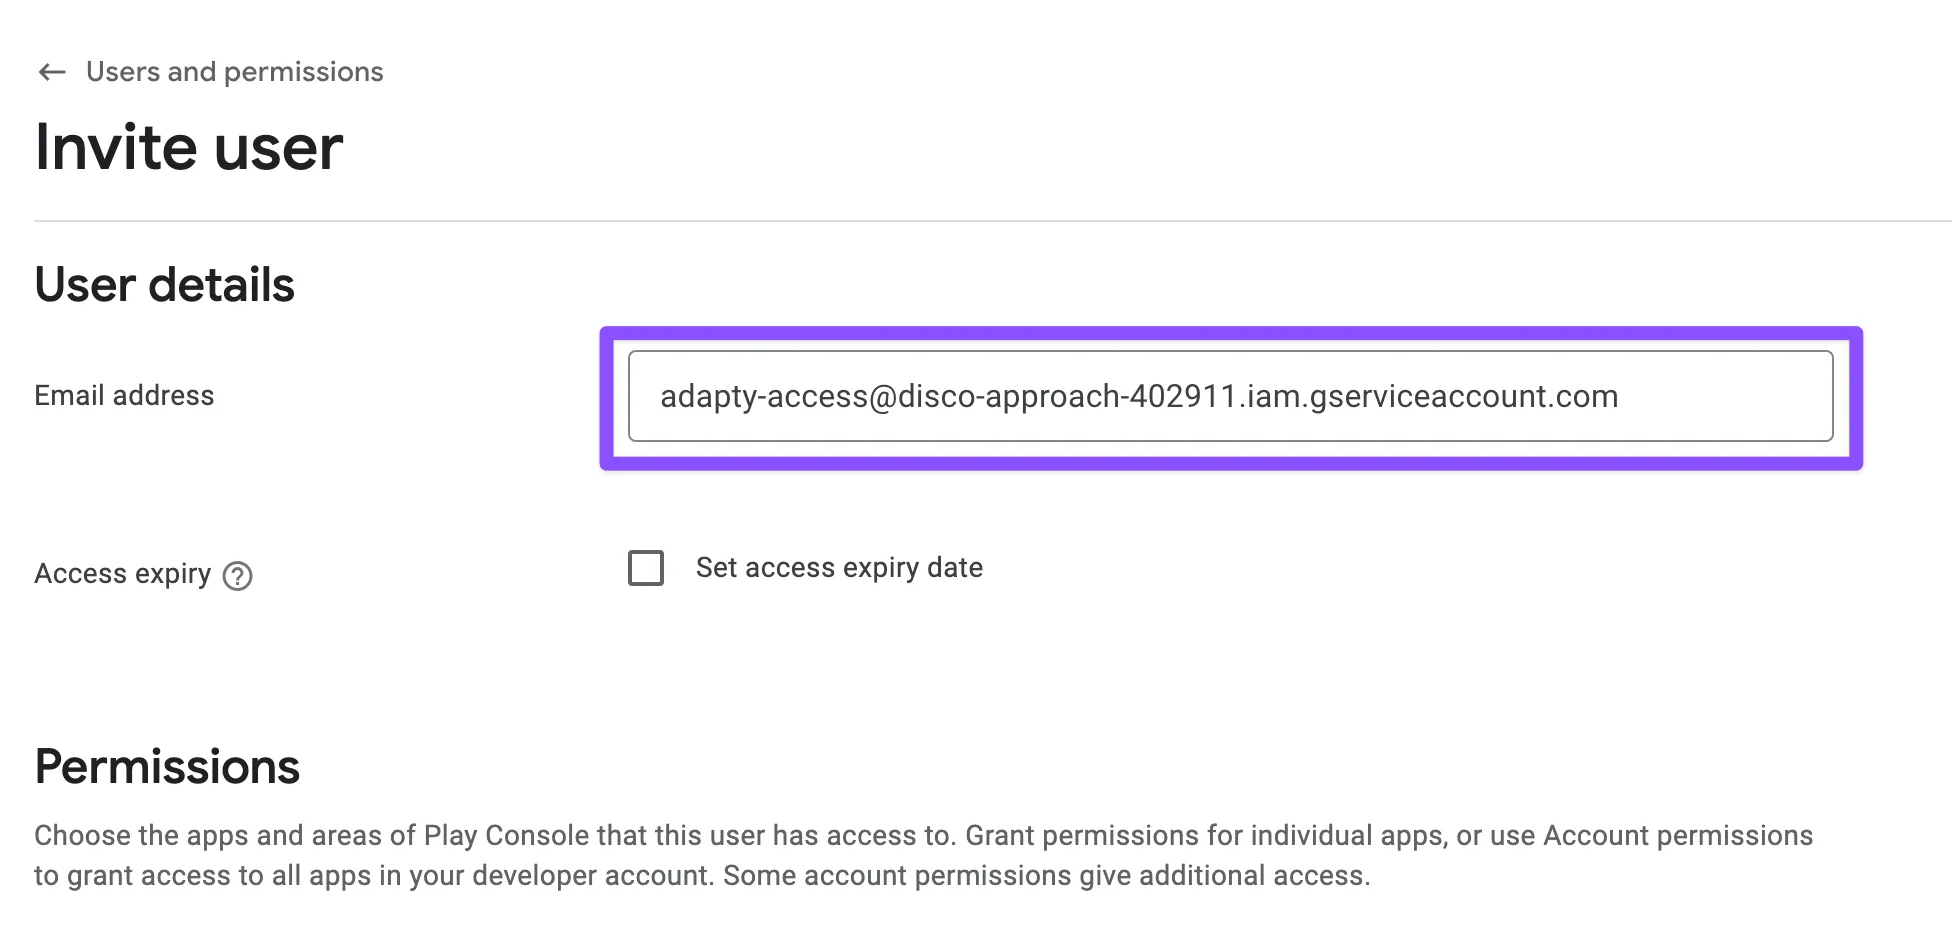
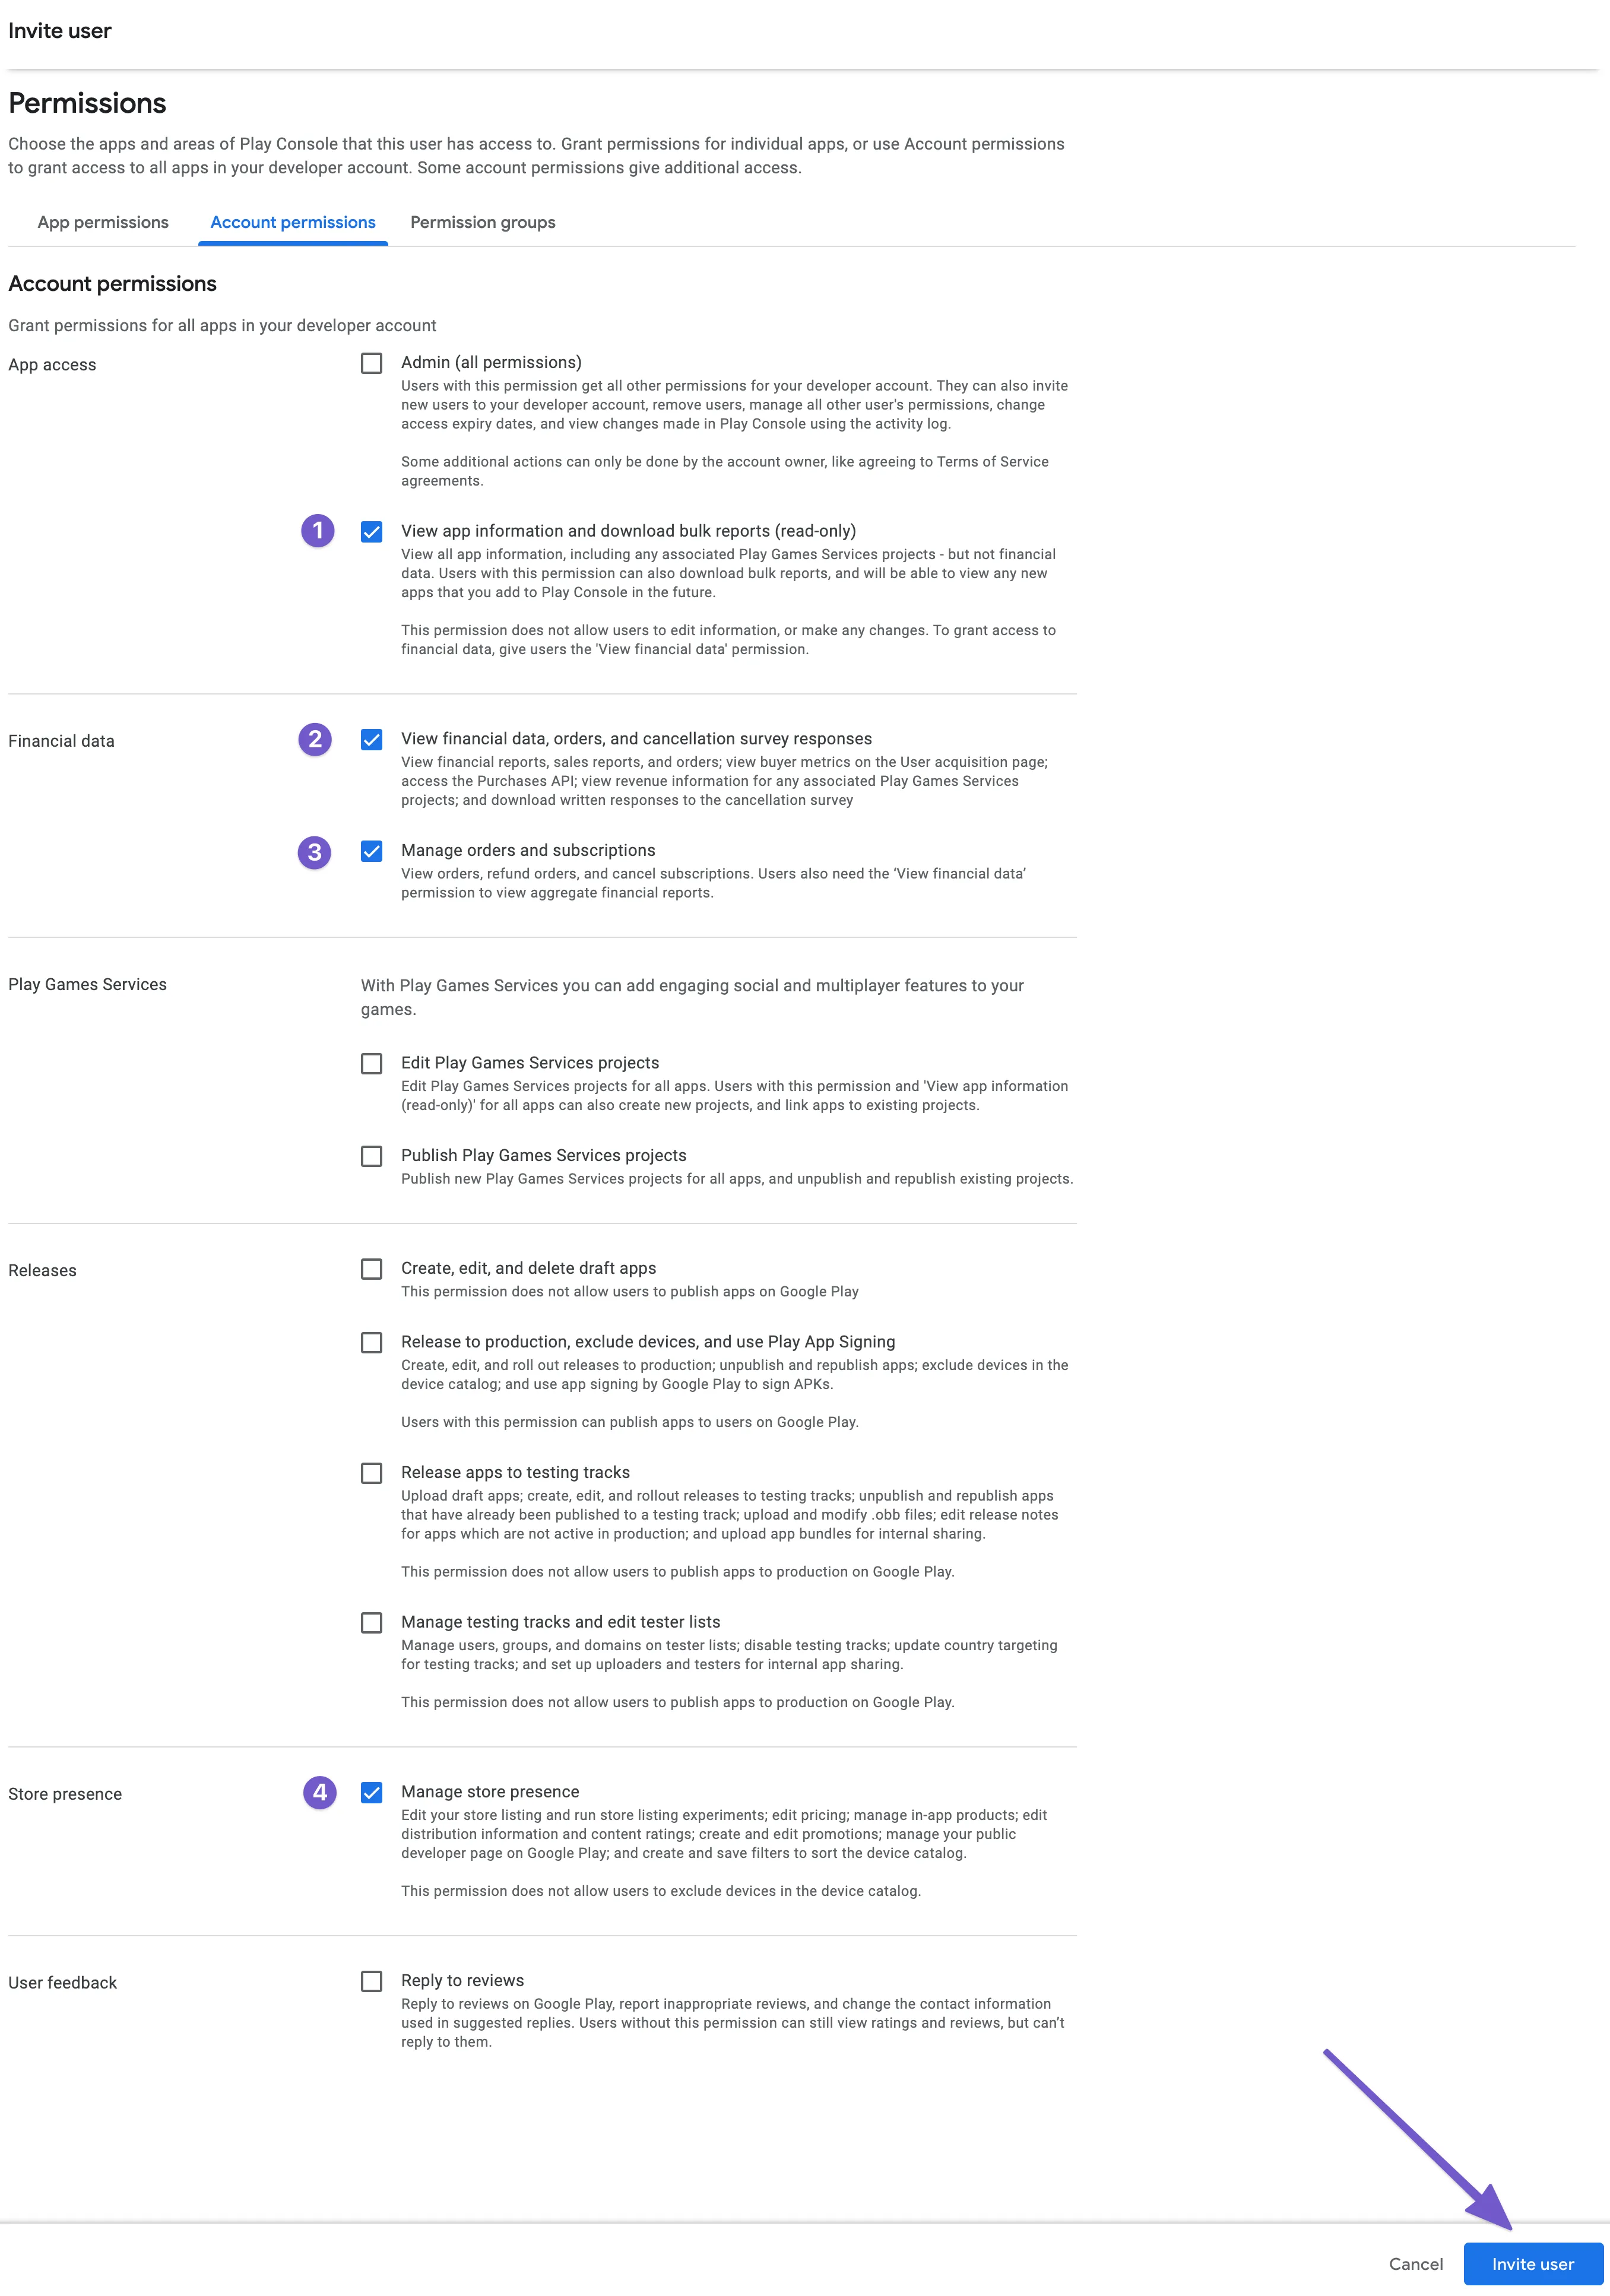
3. Grant **View app information and download bulk reports (read-only)**, **View financial data,** and **Manage store presence** permissions and create the user by clicking **Invite user**. You can grant permissions to the whole account or to one/several applications.